
먼저 그래들 dependencies 안에 material 관련 라이브러리를 추가하자.
이러한 하단탭은 이 material 에서 가져온다.
[ build.gradle (app) ]
|
1
2
3
4
5
|
dependencies {
........
implementation 'com.google.android.material:material:1.0.0'
}
|
cs |
[ /res/values/colors.xml ]
|
1
2
3
4
5
6
7
|
<?xml version="1.0" encoding="utf-8"?>
<resources>
<color name="colorPrimary">#008577</color>
<color name="colorPrimaryDark">#00574B</color>
<color name="colorAccent">#D81B60</color>
</resources>
|
cs |
[ /res/menu/menu_bottom.xml ]
|
1
2
3
4
5
6
7
8
9
10
11
12
13
14
15
16
17
18
19
20
|
<?xml version="1.0" encoding="utf-8"?>
<menu xmlns:android="http://schemas.android.com/apk/res/android"
xmlns:app="http://schemas.android.com/apk/res-auto">
<item android:id="@+id/tab1"
android:enabled="true"
app:showAsAction="ifRoom"
android:title="이메일"
android:icon="@android:drawable/ic_dialog_email"/>
<item android:id="@+id/tab2"
app:showAsAction="ifRoom"
android:title="정보"
android:icon="@android:drawable/ic_dialog_info"/>
<item android:id="@+id/tab3"
app:showAsAction="ifRoom"
android:title="위치"
android:icon="@android:drawable/ic_dialog_map"/>
</menu>
|
cs |
하단탭이 메뉴 형태로 깔끔하게 xml 으로 만든다.
[ /res/layout/activity_main.xml ]
|
1
2
3
4
5
6
7
8
9
10
11
12
13
14
15
16
17
18
19
20
21
22
23
24
25
26
27
28
29
|
<?xml version="1.0" encoding="utf-8"?>
<androidx.constraintlayout.widget.ConstraintLayout xmlns:android="http://schemas.android.com/apk/res/android"
xmlns:app="http://schemas.android.com/apk/res-auto"
xmlns:tools="http://schemas.android.com/tools"
android:layout_width="match_parent"
android:layout_height="match_parent"
tools:context=".MainActivity">
<FrameLayout
android:id="@+id/container"
android:layout_width="match_parent"
android:layout_height="match_parent"
app:layout_behavior="@string/appbar_scrolling_view_behavior"/>
<com.google.android.material.bottomnavigation.BottomNavigationView
android:id="@+id/bottom_navigation"
android:layout_width="match_parent"
android:layout_height="wrap_content"
android:layout_marginEnd="0dp"
android:layout_marginStart="0dp"
app:layout_constraintBottom_toBottomOf="parent"
app:layout_constraintLeft_toLeftOf="parent"
app:layout_constraintRight_toRightOf="parent"
app:itemBackground="@color/colorPrimary"
app:itemIconTint="@drawable/item_color"
app:itemTextColor="@drawable/item_color"
app:menu="@menu/menu_bottom" />
</androidx.constraintlayout.widget.ConstraintLayout>
|
cs |
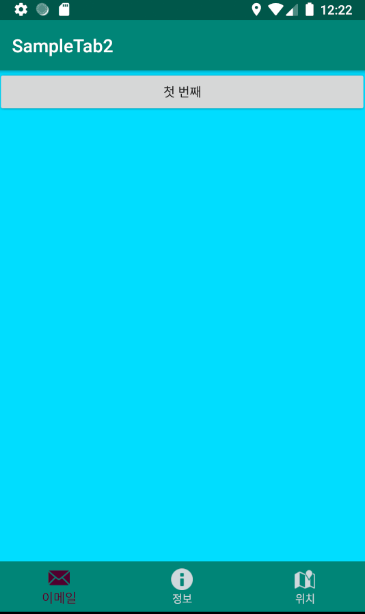
위의 소스에서 BottomNavigationView 가 하단탭 부분이다.
[ fragment1.xml ]
|
1
2
3
4
5
6
7
8
9
10
11
12
13
14
15
16
|
<?xml version="1.0" encoding="utf-8"?>
<LinearLayout xmlns:android="http://schemas.android.com/apk/res/android"
xmlns:tools="http://schemas.android.com/tools"
android:layout_width="match_parent"
android:layout_height="match_parent"
android:orientation="vertical"
android:background="@android:color/holo_blue_bright"
tools:context=".Fragment1">
<Button
android:id="@+id/button"
android:layout_width="match_parent"
android:layout_height="wrap_content"
android:text="첫 번째" />
</LinearLayout>
|
cs |
[ fragment2.xml ]
|
1
2
3
4
5
6
7
8
9
10
11
12
13
14
15
16
|
<?xml version="1.0" encoding="utf-8"?>
<LinearLayout xmlns:android="http://schemas.android.com/apk/res/android"
xmlns:tools="http://schemas.android.com/tools"
android:layout_width="match_parent"
android:layout_height="match_parent"
android:orientation="vertical"
android:background="@android:color/holo_orange_light"
tools:context=".Fragment2">
<Button
android:id="@+id/button"
android:layout_width="match_parent"
android:layout_height="wrap_content"
android:text="두 번째" />
</LinearLayout>
|
cs |
[ fragment3.xml ]
|
1
2
3
4
5
6
7
8
9
10
11
12
13
14
15
16
|
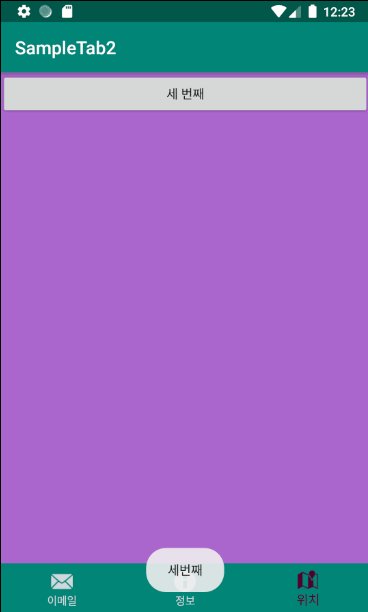
<?xml version="1.0" encoding="utf-8"?>
<LinearLayout xmlns:android="http://schemas.android.com/apk/res/android"
xmlns:tools="http://schemas.android.com/tools"
android:layout_width="match_parent"
android:layout_height="match_parent"
android:orientation="vertical"
android:background="@android:color/holo_purple"
tools:context=".Fragment3">
<Button
android:id="@+id/button"
android:layout_width="match_parent"
android:layout_height="wrap_content"
android:text="세 번째" />
</LinearLayout>
|
cs |
[ Fragment1.java ]
|
1
2
3
4
5
6
7
8
9
10
11
12
13
14
15
16
17
18
19
20
21
22
|
import android.os.Bundle;
import androidx.fragment.app.Fragment;
import android.view.LayoutInflater;
import android.view.View;
import android.view.ViewGroup;
public class Fragment1 extends Fragment {
public Fragment1() {
// Required empty public constructor
}
@Override
public View onCreateView(LayoutInflater inflater, ViewGroup container,
Bundle savedInstanceState) {
// Inflate the layout for this fragment
return inflater.inflate(R.layout.fragment1, container, false);
}
}
|
cs |
[ Fragment2.java ]
|
1
2
3
4
5
6
7
8
9
10
11
12
13
14
15
16
17
18
19
20
21
22
23
|
import android.os.Bundle;
import androidx.fragment.app.Fragment;
import android.view.LayoutInflater;
import android.view.View;
import android.view.ViewGroup;
public class Fragment2 extends Fragment {
public Fragment2() {
// Required empty public constructor
}
@Override
public View onCreateView(LayoutInflater inflater, ViewGroup container,
Bundle savedInstanceState) {
// Inflate the layout for this fragment
return inflater.inflate(R.layout.fragment2, container, false);
}
}
|
cs |
[ Fragment3.java ]
|
1
2
3
4
5
6
7
8
9
10
11
12
13
14
15
16
17
18
19
20
21
22
23
|
import android.os.Bundle;
import androidx.fragment.app.Fragment;
import android.view.LayoutInflater;
import android.view.View;
import android.view.ViewGroup;
public class Fragment3 extends Fragment {
public Fragment3() {
// Required empty public constructor
}
@Override
public View onCreateView(LayoutInflater inflater, ViewGroup container,
Bundle savedInstanceState) {
// Inflate the layout for this fragment
return inflater.inflate(R.layout.fragment3, container, false);
}
}
|
cs |
[ MainActivity.java ]
|
1
2
3
4
5
6
7
8
9
10
11
12
13
14
15
16
17
18
19
20
21
22
23
24
25
26
27
28
29
30
31
32
33
34
35
36
37
38
39
40
41
42
43
44
45
46
47
48
49
50
|
import androidx.annotation.NonNull;
import androidx.appcompat.app.AppCompatActivity;
import android.os.Bundle;
import android.view.MenuItem;
import android.widget.Toast;
import com.google.android.material.bottomnavigation.BottomNavigationView;
public class MainActivity extends AppCompatActivity {
Fragment1 fragment1;
Fragment2 fragment2;
Fragment3 fragment3;
@Override
protected void onCreate(Bundle savedInstanceState) {
super.onCreate(savedInstanceState);
setContentView(R.layout.activity_main);
fragment1 = new Fragment1();
fragment2 = new Fragment2();
fragment3 = new Fragment3();
getSupportFragmentManager().beginTransaction().replace(R.id.container,fragment1).commit();
BottomNavigationView bottomNavigation = findViewById(R.id.bottom_navigation);
bottomNavigation.setOnNavigationItemSelectedListener(new BottomNavigationView.OnNavigationItemSelectedListener() {
@Override
public boolean onNavigationItemSelected(@NonNull MenuItem item) {
switch (item.getItemId()) {
case R.id.tab1:
Toast.makeText(getApplicationContext(),"첫번째",Toast.LENGTH_SHORT).show();
getSupportFragmentManager().beginTransaction().replace(R.id.container,fragment1).commit();
return true;
case R.id.tab2:
Toast.makeText(getApplicationContext(),"두번째",Toast.LENGTH_SHORT).show();
getSupportFragmentManager().beginTransaction().replace(R.id.container,fragment2).commit();
return true;
case R.id.tab3:
Toast.makeText(getApplicationContext(),"세번째",Toast.LENGTH_SHORT).show();
getSupportFragmentManager().beginTransaction().replace(R.id.container,fragment3).commit();
return true;
}
return false;
}
});
}
}
|
cs |
27라인이 핵심이다. 24라인처럼 화면 로딩시 최초화면은 fragment1.xml 화면을 시작화면으로 한다.