
RecyclerView는 Adapter가 관리하는 Data Set의 특정 데이터 항목에 대하여 미리 정의된 View를 통해 스크롤이 있는 List 형식으로 표현할 수 있습니다. 이번 포스팅에서는 한 개의 RecyclerView에서 여러 Type의 View를 정의해놓고 데이터의 타입에 따라 각각 다른 ViewType을 적용시키는 방법을 알아보겠습니다.
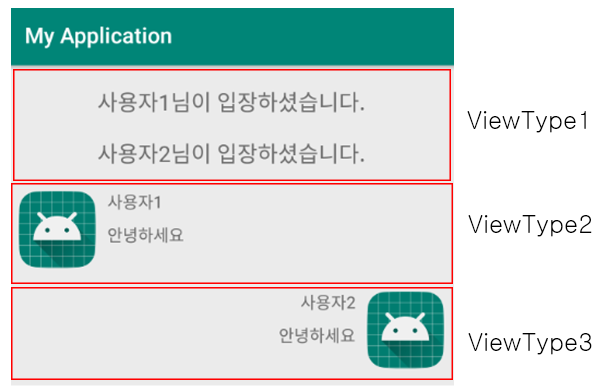
간단한 채팅 UI를 가지는 RecyclerView를 구현 할것입니다. 해당 RecyclerView에서 사용하는 ViewType은 3개로 중앙에 표시되는 Type과 왼쪽에 채팅내용이 나오는 Type과 오른쪽에 채팅 내용이 나오는 Type 3개로 구성됩니다.
1. DataItem
public class DataItem {

    private String content;
    private String name;
    private int viewType;

    public DataItem(String content, String name ,int viewType) {
        this.content = content;
        this.viewType = viewType;
        this.name = name;
    }

    public String getContent() {
        return content;
    }

    public String getName() {
        return name;
    }

    public int getViewType() {
        return viewType;
    }
}
2. ViewType에 대한 CodeValue 정의
public class Code {
    public class ViewType{
        public static final int LEFT_CONTENT = 0;
        public static final int RIGHT_CONTENT = 1;
        public static final int CENTER_CONTENT = 2;
    }
}
3. activity_main.xml
<?xml version="1.0" encoding="utf-8"?>
<android.support.constraint.ConstraintLayout xmlns:android="http://schemas.android.com/apk/res/android"
    xmlns:app="http://schemas.android.com/apk/res-auto"
    xmlns:tools="http://schemas.android.com/tools"
    android:layout_width="match_parent"
    android:layout_height="match_parent"
    tools:context=".MainActivity">

    <android.support.v7.widget.RecyclerView
        android:id="@+id/recyclerview"
        android:layout_width="match_parent"
        android:layout_height="match_parent" />
</android.support.constraint.ConstraintLayout>
4. 각 ViewType에 대한 View 정의
■ center_content.xml
<?xml version="1.0" encoding="utf-8"?>
<android.support.constraint.ConstraintLayout xmlns:android="http://schemas.android.com/apk/res/android"
    xmlns:app="http://schemas.android.com/apk/res-auto"
    android:layout_width="match_parent"
    android:layout_height="wrap_content">

    <TextView
        android:id="@+id/content"
        android:layout_width="wrap_content"
        android:layout_height="wrap_content"
        android:layout_marginTop="20dp"
        android:text="TextView"
        android:textSize="20dp"
        app:layout_constraintBottom_toBottomOf="parent"
        app:layout_constraintLeft_toLeftOf="parent"
        app:layout_constraintRight_toRightOf="parent"
        app:layout_constraintTop_toTopOf="parent" />
</android.support.constraint.ConstraintLayout>
▼ 채팅 UI에서 Center의 Content를 표시하기 위한 View입니다. ViewType은 CENTER_CONTENT Code 값을 가지게 됩니다.
■ left_content.xml
<?xml version="1.0" encoding="utf-8"?>
<android.support.constraint.ConstraintLayout xmlns:android="http://schemas.android.com/apk/res/android"
    xmlns:app="http://schemas.android.com/apk/res-auto"
    android:layout_width="match_parent"
    android:layout_height="wrap_content">

    <ImageView
        android:id="@+id/imageView"
        android:layout_width="wrap_content"
        android:layout_height="wrap_content"
        android:layout_marginLeft="10dp"
        android:layout_marginTop="20dp"
        app:layout_constraintBottom_toBottomOf="parent"
        app:layout_constraintLeft_toLeftOf="parent"
        app:layout_constraintTop_toTopOf="parent"
        app:srcCompat="@mipmap/ic_launcher_round" />

    <TextView
        android:id="@+id/name"
        android:layout_width="wrap_content"
        android:layout_height="wrap_content"
        android:layout_marginLeft="10dp"
        android:layout_marginTop="20dp"
        android:text="TextView"
        app:layout_constraintLeft_toRightOf="@id/imageView"
        app:layout_constraintTop_toTopOf="parent" />

    <TextView
        android:id="@+id/content"
        android:layout_width="wrap_content"
        android:layout_height="wrap_content"
        android:layout_marginLeft="10dp"
        android:layout_marginTop="10dp"
        android:text="TextView"
        app:layout_constraintLeft_toRightOf="@id/imageView"
        app:layout_constraintTop_toBottomOf="@id/name" />
</android.support.constraint.ConstraintLayout>
■ right_content.xml
<?xml version="1.0" encoding="utf-8"?>
<android.support.constraint.ConstraintLayout xmlns:android="http://schemas.android.com/apk/res/android"
    xmlns:app="http://schemas.android.com/apk/res-auto"
    android:layout_width="match_parent"
    android:layout_height="wrap_content">

    <ImageView
        android:id="@+id/imageView"
        android:layout_width="wrap_content"
        android:layout_height="wrap_content"
        android:layout_marginRight="10dp"
        android:layout_marginTop="20dp"
        app:layout_constraintBottom_toBottomOf="parent"
        app:layout_constraintRight_toRightOf="parent"
        app:layout_constraintTop_toTopOf="parent"
        app:srcCompat="@mipmap/ic_launcher_round" />

    <TextView
        android:id="@+id/name"
        android:layout_width="wrap_content"
        android:layout_height="wrap_content"
        android:layout_marginRight="10dp"
        android:layout_marginTop="20dp"
        android:text="TextView"
        app:layout_constraintRight_toLeftOf="@id/imageView"
        app:layout_constraintTop_toTopOf="parent" />

    <TextView
        android:id="@+id/content"
        android:layout_width="wrap_content"
        android:layout_height="wrap_content"
        android:layout_marginRight="10dp"
        android:layout_marginTop="10dp"
        android:text="TextView"
        app:layout_constraintRight_toLeftOf="@id/imageView"
        app:layout_constraintTop_toBottomOf="@id/name" />
</android.support.constraint.ConstraintLayout>
5. Adapter 구현
public class MyAdapter extends RecyclerView.Adapter<RecyclerView.ViewHolder>{

        private ArrayList<DataItem> myDataList = null;

        MyAdapter(ArrayList<DataItem> dataList)
        {
            myDataList = dataList;
        }

        @Override
        public RecyclerView.ViewHolder onCreateViewHolder(ViewGroup parent, int viewType)
        {
            View view;
            Context context = parent.getContext();
            LayoutInflater inflater = (LayoutInflater) context.getSystemService(Context.LAYOUT_INFLATER_SERVICE);

            if(viewType == Code.ViewType.CENTER_CONTENT)
            {
                view = inflater.inflate(R.layout.center_content, parent, false);
                return new CenterViewHolder(view);
            }
            else if(viewType == Code.ViewType.LEFT_CONTENT)
            {
                view = inflater.inflate(R.layout.left_content, parent, false);
                return new LeftViewHolder(view);
            }
            else
            {
                view = inflater.inflate(R.layout.right_content, parent, false);
                return new RightViewHolder(view);
            }
        }

        @Override
        public void onBindViewHolder(RecyclerView.ViewHolder viewHolder, int position)
        {
            if(viewHolder instanceof CenterViewHolder)
            {
                ((CenterViewHolder) viewHolder).content.setText(myDataList.get(position).getContent());
            }
            else if(viewHolder instanceof LeftViewHolder)
            {
                ((LeftViewHolder) viewHolder).name.setText(myDataList.get(position).getName());
                ((LeftViewHolder) viewHolder).content.setText(myDataList.get(position).getContent());
            }
            else
            {
                ((RightViewHolder) viewHolder).name.setText(myDataList.get(position).getName());
                ((RightViewHolder) viewHolder).content.setText(myDataList.get(position).getContent());
            }
        }

        @Override
        public int getItemCount()
        {
            return myDataList.size();
        }

        @Override
        public int getItemViewType(int position) {
            return myDataList.get(position).getViewType();
        }

        public class CenterViewHolder extends RecyclerView.ViewHolder{
            TextView content;

            CenterViewHolder(View itemView)
            {
                super(itemView);

                content = itemView.findViewById(R.id.content);
            }
        }

        public class LeftViewHolder extends RecyclerView.ViewHolder{
            TextView content;
            TextView name;
            ImageView image;

            LeftViewHolder(View itemView)
            {
                super(itemView);

                content = itemView.findViewById(R.id.content);
                name = itemView.findViewById(R.id.name);
                image = itemView.findViewById(R.id.imageView);
            }
        }

        public class RightViewHolder extends RecyclerView.ViewHolder{
            TextView content;
            TextView name;
            ImageView image;

            RightViewHolder(View itemView)
            {
                super(itemView);

                content = itemView.findViewById(R.id.content);
                name = itemView.findViewById(R.id.name);
                image = itemView.findViewById(R.id.imageView);
            }
        }
▼ 가장 중요한 Adapter 구현 내용입니다. ViewType 마다 ViewHolder 클래스를 따로 정의하며 onCreateViewHolder() 함수에서 두 번째 인자로 넘어오는 viewType 값에 따라 다른 ViewHolder 객체를 생성하여 리턴하게 됩니다. 두 번째 인자로 넘어오는 viewType은 getItemViewType() 함수를 재정의하여 각 아이템 항목에 맞는 ViewType 값을 리턴하도록 재정의합니다.
6. MainActivity.java 구현
public class MainActivity extends AppCompatActivity {

    private ArrayList<DataItem> dataList;

    @Override
    protected void onCreate(Bundle savedInstanceState) {
        super.onCreate(savedInstanceState);
        setContentView(R.layout.activity_main);

        this.initializeData();

        RecyclerView recyclerView = findViewById(R.id.recyclerview);

        LinearLayoutManager manager
                = new LinearLayoutManager(this, LinearLayoutManager.VERTICAL,false);

        recyclerView.setLayoutManager(manager); // LayoutManager 등록
        recyclerView.setAdapter(new MyAdapter(dataList));  // Adapter 등록
    }

    public void initializeData()
    {
        dataList = new ArrayList<>();

        dataList.add(new DataItem("사용자1님이 입장하셨습니다.", null,  Code.ViewType.CENTER_CONTENT));
        dataList.add(new DataItem("사용자2님이 입장하셨습니다.", null,  Code.ViewType.CENTER_CONTENT));
        dataList.add(new DataItem("안녕하세요", "사용자1",  Code.ViewType.LEFT_CONTENT));
        dataList.add(new DataItem("안녕하세요", "사용자2",  Code.ViewType.RIGHT_CONTENT));

    }
}