이번에는 안드로이드에서 스프링 프로젝트로 요청시 JSON으로 서버에서 제공하는 데이터를 가져오는 방식을 다루어 보겠습니다.
1. 먼저, 스프링 프로젝트에서 pom.xml에 라이브러리를 추가합니다.
1) jackson-databind 추가
: @ResponseBody로 반환시 필요
<dependency>
<groupId>com.fasterxml.jackson.core</groupId>
<artifactId>jackson-databind</artifactId>
<version>2.8.7</version>
</dependency>
2) jason-simple 추가
: JSONObject와 같은 json 객체 생성시 필요
<dependency>
<groupId>com.googlecode.json-simple</groupId>
<artifactId>json-simple</artifactId>
<version>1.1.1</version>
</dependency>
2. 다음으로 스프링 컨트롤러 부분을 작성합니다. 스프링 컨트롤러에서 다음의 코드를 입력합니다.
1 2 3 4 5 6 7 8 9 10 11 12 13 14 15 16 17 18 19 20 21 22 23 24 25 26 27 | <span style="font-size: 12pt;">@RequestMapping(value="json.do",produces="application/json;charset=utf-8") public @ResponseBody JSONObject json(){ // json-simple 라이브러리 추가 필요(JSON 객체 생성) JSONObject jsonMain = new JSONObject(); // json 객체 // {변수명:값, 변수명:값} // {sendData:[{변수명:값},{변수명:값},...]} List<BookDTO> items = bookService.bookList(); JSONArray jArray = new JSONArray(); // json배열 for(int i=0; i<items.size(); i++){ BookDTO dto = items.get(i); JSONObject row = new JSONObject(); // json객체.put("변수명",값) row.put("book_code", dto.getBook_code()); row.put("book_name", dto.getBook_name()); row.put("press", dto.getPress()); row.put("price", dto.getPrice()); row.put("amount", dto.getAmount()); // 배열에 추가 // json배열.add(인덱스,json객체) jArray.add(i,row); } // json객체에 배열을 넣음 jsonMain.put("sendData", jArray); return jsonMain; }</span> |
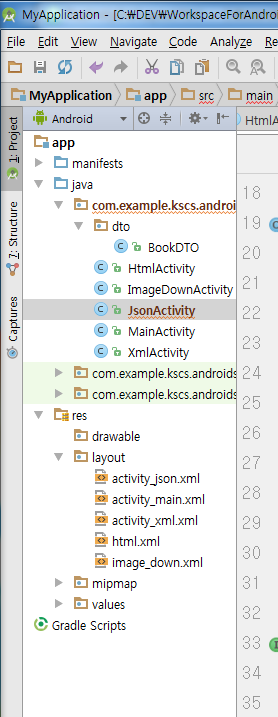
 여기 Android일 땐 보이지 않지만
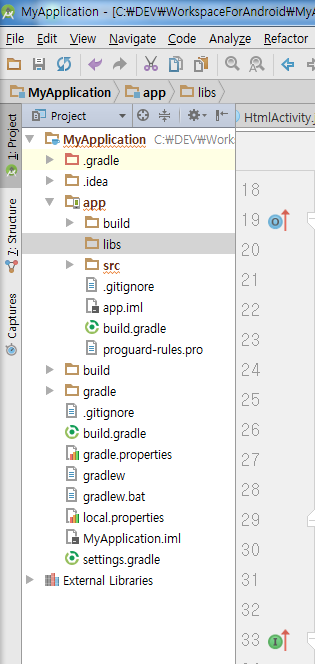
 Project로 변경시 app/libs 폴더가 보입니다. 그러면 이 폴더에 다운받은 2개의 라이브러리를 집어 넣습니다.
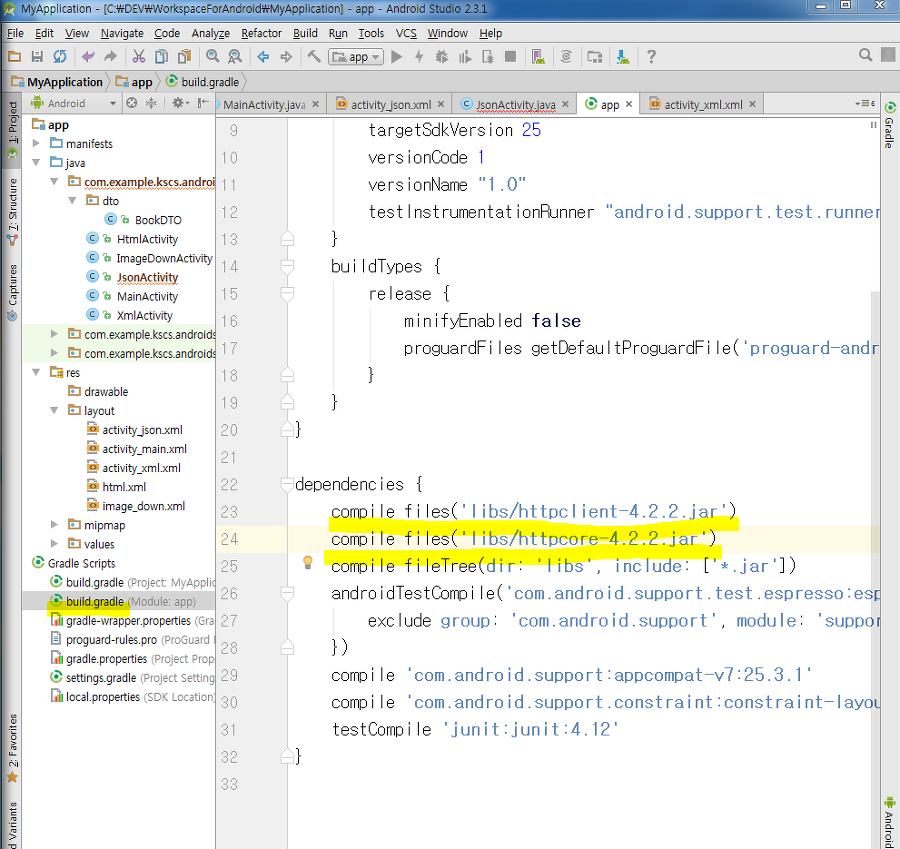
다음으로, android 형식으로 보기를 다시 누르고, Gradle Scripts 의 build.gradle 부분에 들어가서
dependency 부분에
다음의 2줄을 추가해줍니다.
compile files('libs/httpclient-4.2.2.jar')
compile files('libs/httpcore-4.2.2.jar')

그리고 Sync Now 선택해주면 적용이 된 것입니다.
3. 이제 안드로이드에서 코드를 작성합니다.
역시 네트워크 작업임으로 이전에서 했던 3가지 사항을 준수합니다.
1) 인터넷 사용 권한 설정(manifest에)
<!-- 인터넷 접속 권한 추가 -->
<uses-permission android:name="android.permission.INTERNET" />
1 2 3 4 5 6 7 8 9 10 11 12 13 14 15 16 17 18 19 20 21 22 23 24 25 26 27 28 29 30 31 32 33 34 35 36 37 38 39 40 41 42 43 44 45 46 47 48 49 50 51 52 53 54 55 56 57 58 59 60 61 62 63 64 65 66 67 68 69 70 71 72 73 74 75 76 77 78 79 80 81 82 83 84 85 86 87 88 89 90 91 92 93 94 95 96 97 98 99 100 101 102 | package com.example.kscs.androidspringconnection1;import android.graphics.Bitmap;import android.os.Handler;import android.os.Message;import android.support.v7.app.AppCompatActivity;import android.os.Bundle;import android.widget.ArrayAdapter;import android.widget.ListView;import com.example.kscs.androidspringconnection1.dto.BookDTO;import org.apache.http.HttpResponse;import org.apache.http.client.HttpClient;import org.apache.http.client.methods.HttpPost;import org.apache.http.impl.client.DefaultHttpClient;import org.apache.http.util.EntityUtils;import org.json.JSONArray;import org.json.JSONObject;import java.util.ArrayList;import java.util.List;public class JsonActivity extends AppCompatActivity implements Runnable{ // 1. 변수 선언 ListView listView1; List<BookDTO> items; @Override protected void onCreate(Bundle savedInstanceState) { super.onCreate(savedInstanceState); setContentView(R.layout.activity_json); // 2. 위젯 연결 listView1 = (ListView)findViewById(R.id.listView1); items = new ArrayList<>(); // 3. 백그라운드 스래드 생성 Thread th = new Thread(this); th.start(); } // 네트워크 작업임으로 백그라운드 스레드로 동작시키기 위함(의무) @Override public void run() { try{ // httpclient-4.2.2.jar와 httpcore-4.2.2.jar를 mvnrepository에서 찾아 Files에 Download jars를 해 받음 // app/libs에 추가 // 이때, android상태에서는 libs가 안보임으로 project로 변경해서 // lib에 받은 jar파일 2개를 넣어준다. // http client 객체 HttpClient http = new DefaultHttpClient(); // post 방식으로 전송하는 객체 // http클라이언트.execute(httppost객체) : 웬서버에 데이터를 전달 // 결과(json)가 response로 넘어옴 HttpResponse response = http.execute(httpPost); // body에 json 스트링이 넘어옴 String body = EntityUtils.toString(response.getEntity()); // string을 JSONObject로 변환 JSONObject jsonObj = new JSONObject(body); // json객체.get("변수명") JSONArray jArray = (JSONArray)jsonObj.get("sendData"); for(int i=0; i<jArray.length();i++){ // json배열.getJSONObject(인덱스) JSONObject row = jArray.getJSONObject(i); BookDTO dto = new BookDTO(); dto.setAmount(row.getInt("amount")); dto.setBook_code(row.getInt("book_code")); dto.setBook_name(row.getString("book_name")); dto.setPress(row.getString("press")); dto.setPrice(row.getInt("price")); dto.setAmount(row.getInt("amount")); // ArrayList에 add items.add(dto); } // 핸들러에게 메시지를 요청 handler.sendEmptyMessage(0); }catch (Exception e){ e.printStackTrace(); } } // 핸들러 Handler handler = new Handler(){ @Override public void handleMessage(Message msg) { super.handleMessage(msg); // 어댑터 생성 String[] str = new String[items.size()]; for(int i=0; i<str.length; i++){ BookDTO dto = items.get(i); str[i] = dto.getBook_name() + "(" + dto.getPress() + ")"; } ArrayAdapter<String> adapter = new ArrayAdapter<String>(JsonActivity.this,android.R.layout.simple_list_item_1,str); // adapter와 data 바인딩 listView1.setAdapter(adapter); } };} |
// NameValuePair : 변수명과 값을 함께 저장하는 객체로 제공되는 객체이다.
ArrayList<NameValuePair> postData = new ArrayList<>();
// post 방식으로 전달할 값들을 postData 객체에 집어 넣는다.
postData.add(new BasicNameValuePair("id","아이디"));
postData.add(new BasicNameValuePair("pw","패스워드"));
// url encoding이 필요한 값들(한글, 특수문자) : 한글은 인코딩안해주면 깨짐으로 인코딩을 한다.
UrlEncodedFormEntity request = new UrlEncodedFormEntity(postData,"utf-8");
HttpPost httpPost = new HttpPost(url);
// post 방식으로 전달할 데이터 설정
httpPost.setEntity(request);
// post 방식으로 전송, 응답결과는 response로 넘어옴
HttpResponse response = http.execute(httpPost);
// response text를 스트링으로 변환
String body = EntityUtils.toString(response.getEntity());
// 스트링을 json으로 변환한다.
JSONObject obj = new JSONObject(body);// 스프링 컨트롤러에서 리턴해줄 때 저장했던 값을 꺼냄
String message = obj.getString("message");
과 같이 작성하면 된다.1 2 3 4 5 6 7 8 9 10 11 12 13 14 15 16 17 18 | // NameValuePair : 변수명과 값을 함께 저장하는 객체로 제공되는 객체이다.ArrayList<NameValuePair> postData = new ArrayList<>();// post 방식으로 전달할 값들을 postData 객체에 집어 넣는다.postData.add(new BasicNameValuePair("id","아이디"));postData.add(new BasicNameValuePair("pw","패스워드"));// url encoding이 필요한 값들(한글, 특수문자) : 한글은 인코딩안해주면 깨짐으로 인코딩을 한다.UrlEncodedFormEntity request = new UrlEncodedFormEntity(postData,"utf-8");HttpPost httpPost = new HttpPost(url);// post 방식으로 전달할 데이터 설정httpPost.setEntity(request);// post 방식으로 전송, 응답결과는 response로 넘어옴HttpResponse response = http.execute(httpPost);// response text를 스트링으로 변환String body = EntityUtils.toString(response.getEntity());// 스트링을 json으로 변환한다.JSONObject obj = new JSONObject(body);// 스프링 컨트롤러에서 리턴해줄 때 저장했던 값을 꺼냄String message = obj.getString("message"); |
