
1. 액티비티로부터 데이터 가져오기 위한 프로세스
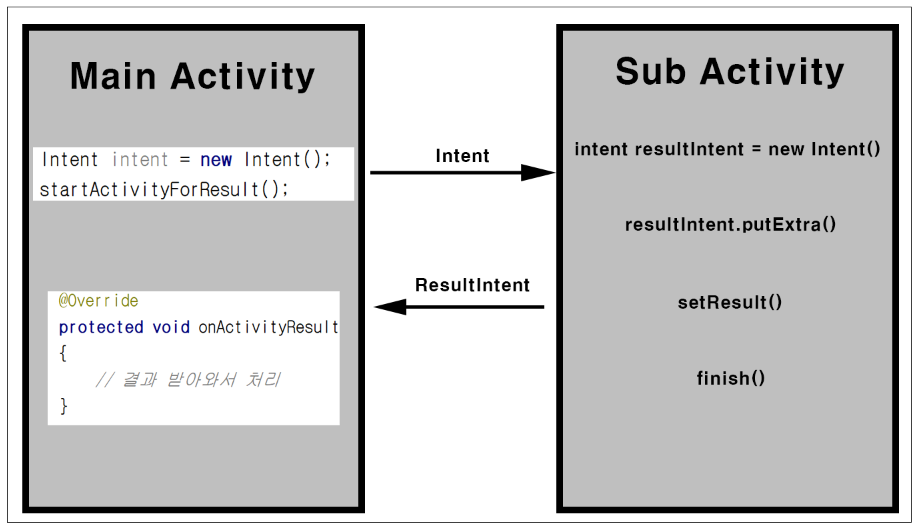
▼ 액티비티(Activity)를 실행할 때 startActivity() 함수를 호출하였습니다. 하지만 액티비티로부터 결과를 얻어오기 위해서는 startActivityResult() 함수를 호출합니다. Sub Activity에서는 자신을 호출한 액티비티에 결과 데이터를 돌려주기 위한 Intent를 새로 생성하고 putExtra() 함수를 통해 데이터를 Intent에 담습니다.
그런 다음 setResult() 함수를 호출하여 실행결과를 전달해주고 finish()를 통해 액티비티를 종료합니다.
MainActivity에서는 결과를 받아와 처리하기 위해서는 onActivityResult() 함수를 오버라이딩합니다.
2. MainActivity 구현
    <LinearLayout
        android:id="@+id/layout"
        android:layout_width="wrap_content"
        android:layout_height="wrap_content"
        android:orientation="vertical"
        tools:layout_editor_absoluteX="8dp"
        tools:layout_editor_absoluteY="8dp">

        <LinearLayout
            android:layout_width="match_parent"
            android:layout_height="match_parent"
            android:orientation="horizontal"></LinearLayout>

        <TextView
            android:id="@+id/textView_name"
            android:layout_width="match_parent"
            android:layout_height="wrap_content"
            android:text="이름" />

        <LinearLayout
            android:layout_width="match_parent"
            android:layout_height="match_parent"
            android:orientation="horizontal"></LinearLayout>

        <TextView
            android:id="@+id/textView_Number"
            android:layout_width="match_parent"
            android:layout_height="wrap_content"
            android:text="번호" />

        <Button
            android:id="@+id/button2"
            android:layout_width="match_parent"
            android:layout_height="match_parent"
            android:onClick="OnClickHandler"
            android:text="Sub Activity 실행하기" />
    </LinearLayout>
▼ Main Activity 화면 구성을 위한 XML 레이아웃 리소스입니다. TextView 2개와 Buton 1개가 배치된 형태이며 각 TextView에는 SubActivity로부터 받아온 이름과 번호를 표시하기 위한 용도로 사용합니다.
public class MainActivity extends AppCompatActivity{

    private TextView textView_name;
    private TextView textView_number;

    @Override
    protected void onCreate(Bundle savedInstanceState) {
        super.onCreate(savedInstanceState);
        setContentView(R.layout.activity_main);

        textView_name = (TextView)findViewById(R.id.textView_name);
        textView_number = (TextView)findViewById(R.id.textView_Number);
    }

    public void OnClickHandler(View view)
    {
        Intent intent = new Intent(this,SubActivity.class);
        startActivityForResult(intent, Code.requestCode);
    }

    @Override
    protected void onActivityResult(int requestCode, int resultCode, Intent resultIntent)
    {
        if(requestCode == Code.requestCode && resultCode == Code.resultCode) {
            textView_name.setText(resultIntent.getStringExtra("name"));
            textView_number.setText(resultIntent.getStringExtra("number"));
        }

    }
}
▼ OnClickHandler()
OnClickHandler() 함수는 Button 클릭 이벤트에 대한 처리를 담당합니다. SubActivity를 실행하기 위해 Intent 객체를 생성하고 startActivityForResult() 함수를 호출합니다. 첫 번째 인자는 Intent 객체가 넘어가고 두 번째 인자의 경우는 식별코드를 넘겨줍니다. 식별코드의 경우는 SubActivity를 실행하는 주체가 MainActivity 말고 여러 군데가 있을 경우 실행하는 Activity에 따라 처리를 분기하기 위한 용도로 사용됩니다. 각종 코드값은 아래와 같이 구현되어 있습니다.
public class Code {
    public static int requestCode = 100;
    public static int resultCode = 1;
}
▼ OnActivityResult()
OnActivityResult() 함수를 오버라이딩하여 SubActivity로부터 받아온 데이터를 가져와 상황에 맞는 작업을 처리할 수 있습니다. 넘어오는 인자 정보는 3개로 첫 번째로 requestCode로 startActivityResult() 두 번째 인자 정보로 넘겼던 코드값과 동일한 값을 넘겨줍니다. 두 번째 인자는 resultCode로 SubActivity에서 실행결과가 정상적인지를 판단하는 용도로 사용합니다. 세 번째는 Sub Activity에서 생성한 결과 데이터가 담긴 Intent 객체입니다. 해당 Intent 객체의 타입에 맞는 getxxxExtra() 함수를 호출하여 원하는 데이터를 가져올 수 있습니다.
3. SubActivity 구현
    <LinearLayout
        android:layout_width="match_parent"
        android:layout_height="match_parent"
        android:orientation="vertical">

        <LinearLayout
            android:layout_width="wrap_content"
            android:layout_height="wrap_content"
            android:orientation="horizontal">

            <TextView
                android:id="@+id/textView"
                android:layout_width="wrap_content"
                android:layout_height="wrap_content"
                android:layout_weight="1"
                android:text="이름" />

            <EditText
                android:id="@+id/editText_name"
                android:layout_width="wrap_content"
                android:layout_height="wrap_content"
                android:layout_weight="1"
                android:ems="10"
                android:inputType="textPersonName"
                android:text="Name" />

        </LinearLayout>

        <LinearLayout
            android:layout_width="wrap_content"
            android:layout_height="wrap_content"
            android:orientation="horizontal">

            <TextView
                android:id="@+id/textView3"
                android:layout_width="wrap_content"
                android:layout_height="wrap_content"
                android:layout_weight="1"
                android:text="번호" />

            <EditText
                android:id="@+id/editText_number"
                android:layout_width="wrap_content"
                android:layout_height="wrap_content"
                android:layout_weight="1"
                android:ems="10"
                android:inputType="textPersonName"
                android:text="Name" />

        </LinearLayout>

        <Button
            android:id="@+id/button"
            android:layout_width="match_parent"
            android:layout_height="wrap_content"
            android:onClick="OnClickHandle"
            android:text="확인" />
    </LinearLayout>
▼ SubActivity 화면구성을 위한 XML 레이아웃 리소스입니다. 이름과 번호를 입력하기 위해 EditText 두 개를 배치한 형태입니다.
public class SubActivity extends AppCompatActivity {

    private EditText editText_name;
    private EditText editText_number;

    @Override
    protected void onCreate(Bundle savedInstanceState) {
        super.onCreate(savedInstanceState);
        setContentView(R.layout.activity_sub);

        this.getEditTextObject();
    }

    public void getEditTextObject()
    {
        editText_name = (EditText)findViewById(R.id.editText_name);
        editText_number = (EditText)findViewById(R.id.editText_number);
    }

    public void OnClickHandle(View view)
    {
        Intent resultIntent = new Intent();

        resultIntent.putExtra("name", editText_name.getText().toString());
        resultIntent.putExtra("number", editText_number.getText().toString());

        setResult(Code.resultCode, resultIntent);
        finish();
    }
}
▼ getEditTextObject()
해당 함수는 EditText의 입력값을 가져오기 위하여 EditText의 참조 객체를 얻어오는 함수입니다.
▼ OnClickHandler()
Button 클릭에 대한 이벤트 처리함수입니다. MainActivity에 결과를 돌려주기 위해 새로운 Intent 객체를 생성하고 EditText의 Text 값을 가져와 putExtra() 함수를 통해 Intent에 담습니다. setResult() 함수를 통해 실행 결과를 돌려주는데 첫 번째 인자는 MainActivity에서 성공적인 실행결과를 확인할 때 사용할 ResultCode 값을 넘겨주고 두 번째 인자는 Intent 객체를 넘겨주게 됩니다.
