1. 컨텍스트 메뉴(Context Menu) 구현 과정
컨텍스트 메뉴(Context Menu)를 구현하는 과정을 살펴보겠습니다. 컨텍스트 메뉴(Context Menu)는 특정 뷰(View)를 길게 눌렀을 때 활성화되는 메뉴입니다. 특정 뷰(View)가 컨텍스트 메뉴(Context Menu)가 동작하는 뷰(View)로 등록하기 위해서는 액티비티의 registerForContextMenu(View view) 함수를 사용합니다.

▼ 특정 뷰(View)에 Context Menu를 등록하기 위해서는 registerForContextMenu() 함수를 통하여 인자정보를 뷰(View) 객체를 넘겨줘야 합니다. 뷰(View) 객체는 findViewById(뷰 리소스 ID)를 통해 얻을수 있습니다.

▼특정 뷰(View)에 대한 Context Menu의 동작을 제어하기 위해서는 위 그림에서 표시된 액티비티의 세 가지 재정의 함수를 사용합니다. onCreateContextMenu()는 Context Menu가 활성화될 때 가장 먼저 호출되는 함수로 Context Menu의 Menu Item을 생성하거나 추가하는 작업을 진행합니다.
이전 옵션 메뉴(Option Menu)의 onPrepareOptionsMenu()와 같은 함수가 따로 없기때문에 Context Menu가 활성화될 때마다 onCreateContextMenu()가 호출됩니다.
▼ ContextMenu가 활성화되고 사용자가 특정 MenuItem을 클릭하였을 때 onContextItemSelected() 함수가 호출됩니다. 위 함수에서는 사용자가 선택한 메뉴에 대한 처리를 진행하면 됩니다.
▼ ConntextMenu가 활성화되고 사용자가 이전 버튼을 클릭하거나 화면상의 다른 뷰(View)에 포커스가 가는 경우에 onContextMenuClosed() 함수가 호출됩니다
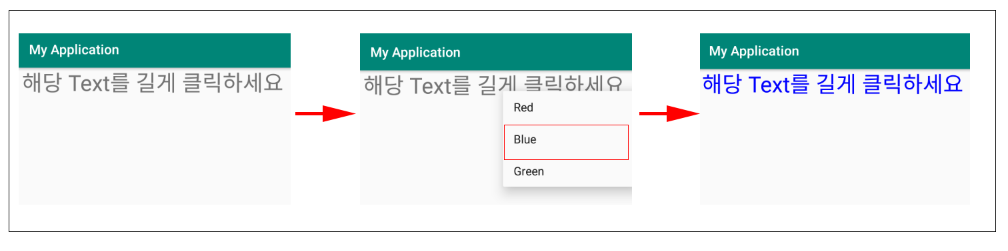
2. 컨텍스트 메뉴(Context Menu) 예제 구현
예제는 TextView에 Context Menu를 등록하고 Menu를 통해 TextView의 Text 색상을 변경하는 간단한 예제입니다. 먼저 예제의 메인 화면 UI를 담당하는 XML 레이아웃 리소스입니다.
<?xml version="1.0" encoding="utf-8"?>
<android.support.constraint.ConstraintLayout xmlns:android="http://schemas.android.com/apk/res/android"
    xmlns:app="http://schemas.android.com/apk/res-auto"
    xmlns:tools="http://schemas.android.com/tools"
    android:layout_width="match_parent"
    android:layout_height="match_parent"
    tools:context=".MainActivity">

    <TextView
        android:id="@+id/textView"
        android:layout_width="0dp"
        android:layout_height="wrap_content"
        android:layout_marginEnd="8dp"
        android:text="해당 Text를 길게 클릭하세요"
        android:textAlignment="center"
        android:textSize="30sp"
        app:layout_constraintEnd_toEndOf="parent"
        app:layout_constraintStart_toStartOf="parent"
        app:layout_constraintTop_toTopOf="parent" />
</android.support.constraint.ConstraintLayout>
다음은 컨텍스트 메뉴(Context Menu)를 구성하는 XML 레이아웃 리소스입니다.
해당 파일의 경로는 /res/menu/context_menu.xml 입니다.
<?xml version="1.0" encoding="utf-8"?>
<menu xmlns:android="http://schemas.android.com/apk/res/android">
    <item
        android:id="@+id/red"
        android:title="Red" />
    <item
        android:id="@+id/blue"
        android:title="Blue" />
    <item
        android:id="@+id/green"
        android:title="Green" />
</menu>
▼ 다음은 MainActivity를 실행하기 위한 자바 소스 코드입니다.
public class MainActivity extends AppCompatActivity {

    private TextView textView;

    @Override
    protected void onCreate(Bundle savedInstanceState) {
        super.onCreate(savedInstanceState);
        setContentView(R.layout.activity_main);

        textView = (TextView) findViewById(R.id.textView);
        registerForContextMenu(textView);
    }

    @Override
    public void onCreateContextMenu(ContextMenu menu,
                                         View v,
                                         ContextMenu.ContextMenuInfo menuInfo)
    {
        MenuInflater inflater = getMenuInflater();
        inflater.inflate(R.menu.context_menu, menu);
    }

    public boolean onContextItemSelected(MenuItem item)
    {
        switch(item.getItemId())
        {
            case R.id.red:
                textView.setTextColor(Color.RED);
                return true;
            case R.id.blue:
                textView.setTextColor(Color.BLUE);
                return true;
            case R.id.green:
                textView.setTextColor(Color.GREEN);
                return true;
        }

        return super.onContextItemSelected(item);
    }
}
▼ onCreate() 함수에서는 TextView 객체를 받아와 registerForContextMenu() 함수를 통해서 해당 뷰(View)에 Context Menu를 등록합니다.
▼onCreateContextMenu() 함수를 재정의하여 Inflater를 통해 Menu 리소스에 정의된 내용을 파싱 하여 컨텍스트 메뉴(Context Menu)를 생성합니다.
▼ onContextItemSelected() 함수를 재정의합니다. 선택 된 MenuItem에 따라 분기하여 TextView의 Text 색상을 지정해주고 있습니다.