
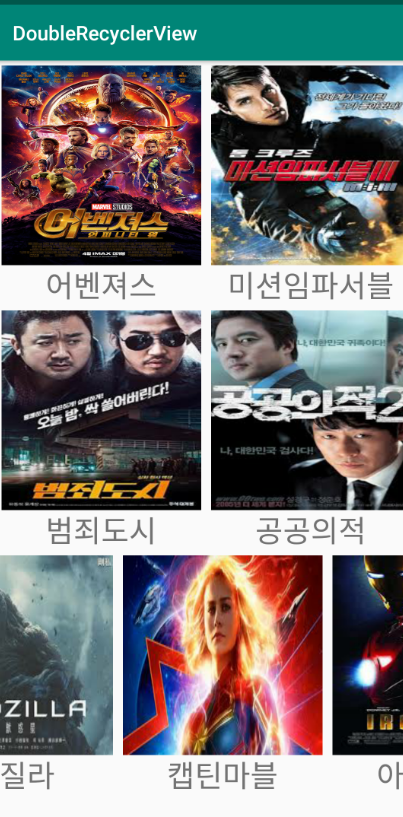
▼ 위 그림처럼 영화정보를 보여주는 간단한 앱을 구현할 것입니다. 기본적인 레이아웃 구조를 설명하자면 메인 화면이 되는 영역에 기본적으로 Item 요소를 수직으로 배치하는 RecyclerView가 배치됩니다. 여기서 Item 요소란 한 row에 표현이 되는 MovieList를 의미합니다. 수평 방향으로 표현되는 MoviewList의 각각의 Movie를 표현하기 위해 수평 방향으로 배치되는 RecyclerView가 배치되는 형태입니다.
1. 수평방향으로 배치되는 RecyclerView 구현
1.1 영화 정보를 포함하는 Movie 클래스 정의
public class Movie {
    private String title;
    private int ResourceID;

    public Movie(int id, String title)
    {
        this.ResourceID = id;
        this.title = title;
    }

    public String getTitle() {
        return title;
    }

    public int getResourceID() {
        return ResourceID;
    }
}
▼ 영화 제목을 위한 title 멤버 변수와 poster 이미지로 사용될 drawable resource ID 값을 가지는 멤버 변수를 가지는 Movie 클래스입니다.
1.2 수평방향 RecyclerView 데이터 항목 표현을 위한 레이아웃 리소스
<android.support.constraint.ConstraintLayout xmlns:android="http://schemas.android.com/apk/res/android"
    xmlns:app="http://schemas.android.com/apk/res-auto"
    android:layout_width="match_parent"
    android:layout_height="match_parent">

    <LinearLayout
        android:id="@+id/linearLayout"
        android:layout_width="wrap_content"
        android:layout_height="wrap_content"
        android:gravity="center_horizontal"
        android:orientation="vertical"
        app:layout_constraintStart_toStartOf="parent"
        app:layout_constraintTop_toTopOf="parent">

        <ImageView
            android:id="@+id/poster"
            android:layout_width="200dp"
            android:layout_height="200dp"
            android:layout_marginLeft="5dp"
            android:layout_marginTop="5dp"
            android:layout_marginRight="5dp"
            android:scaleType="fitXY"
            app:srcCompat="@mipmap/ic_launcher" />

        <TextView
            android:id="@+id/title"
            android:layout_width="match_parent"
            android:layout_height="wrap_content"
            android:text="TextView"
            android:textAlignment="center"
            android:textSize="30dp" />
    </LinearLayout>
</android.support.constraint.ConstraintLayout>
▼ 수평 방향으로 배치되는 RecyclerView의 각각의 데이터 항목은 영화 정보를 의미합니다. LinearLayout 안에 영화 Poster를 표현하기 위한 ImageView와 영화 제목을 표시하기 위한 TextView를 배치한 형태입니다.
1.3 Adapter 및 ViewHolder 구현
public class HorizontalAdapter extends RecyclerView.Adapter<HorizontalAdapter.HorizontalViewHolder> {

    private ArrayList<Movie> dataList;

    public HorizontalAdapter(ArrayList<Movie> data)
    {
        this.dataList = data;
    }

    public class HorizontalViewHolder extends RecyclerView.ViewHolder{
        protected ImageView image;
        protected TextView title;

        public HorizontalViewHolder(View view)
        {
            super(view);
            image = view.findViewById(R.id.poster);
            title = view.findViewById(R.id.title);
        }
    }

    @NonNull
    @Override
    public HorizontalViewHolder onCreateViewHolder(ViewGroup viewGroup, int i)
    {
        View v = LayoutInflater
        	.from(viewGroup.getContext())
            .inflate(R.layout.recyclerview_horizontal, null);

        return new HorizontalAdapter.HorizontalViewHolder(v);
    }

    @Override
    public void onBindViewHolder(HorizontalViewHolder horizontalViewHolder, int position)
    {
        horizontalViewHolder
        	.image
            .setImageResource(dataList.get(position).getResourceID());
        horizontalViewHolder
        	.title
        	.setText(dataList.get(position).getTitle());
    }

    @Override
    public int getItemCount() {
        return dataList.size();
    }
}
2. 수직방향으로 배치되는 RecyclerView 구현
2.1 데이터 항목 표현을 위한 레이아웃 리소스
<android.support.constraint.ConstraintLayout
    xmlns:android="http://schemas.android.com/apk/res/android" android:layout_width="match_parent"
    android:layout_height="match_parent">

    <android.support.v7.widget.RecyclerView
        android:id="@+id/recyclerViewVertical"
        android:layout_width="match_parent"
        android:layout_height="match_parent" />
</android.support.constraint.ConstraintLayout>
▼ 수직 방향으로 배치되는 RecyclerView의 각각의 데이터 항목은 앞서 구현한 수평 방향으로 영화 정보를 나열하는 RecyclerView가 배치됩니다.
2.2 Adapter 및 ViewHolder 구현
public class VerticalAdapter extends RecyclerView.Adapter<VerticalAdapter.VerticalViewHolder>{

    private ArrayList<ArrayList<Movie>> AllMovieList;
    private Context context;

    public VerticalAdapter(Context context, ArrayList<ArrayList<Movie>> data)
    {
        this.context = context;
        this.AllMovieList = data;
    }

    public class VerticalViewHolder extends RecyclerView.ViewHolder{
        protected RecyclerView recyclerView;

        public VerticalViewHolder(View view)
        {
            super(view);

            this.recyclerView = (RecyclerView)view.findViewById(R.id.recyclerViewVertical);
        }
    }

    @NonNull
    @Override
    public VerticalViewHolder onCreateViewHolder(@NonNull ViewGroup viewGroup, int i) {
        View v = LayoutInflater.from(viewGroup.getContext()).inflate(R.layout.recyclerview_vertical, null);
        return new VerticalAdapter.VerticalViewHolder(v);
    }

    @Override
    public void onBindViewHolder(@NonNull VerticalViewHolder verticalViewHolder, int position) {
        HorizontalAdapter adapter = new HorizontalAdapter(AllMovieList.get(position));

        verticalViewHolder.recyclerView.setHasFixedSize(true);
        verticalViewHolder.recyclerView.setLayoutManager(new LinearLayoutManager(context
                , LinearLayoutManager.HORIZONTAL
                ,false));
        verticalViewHolder.recyclerView.setAdapter(adapter);
    }

    @Override
    public int getItemCount() {
        return AllMovieList.size();
    }
}
▼ 앞서 말한대로 수직 RecyclerView의 데이터 항목은 앞서 구현한 수평 RecyclerView가 배치된다고 하였습니다. 그러기 위해 onBindViewHolder에서 HorizontalAdapter 객체를 생성하여 현재 RecyclerView의 Adapter로 연결해줍니다.
3. Main 화면 구현
<?xml version="1.0" encoding="utf-8"?>
<android.support.constraint.ConstraintLayout xmlns:android="http://schemas.android.com/apk/res/android"
    xmlns:app="http://schemas.android.com/apk/res-auto"
    xmlns:tools="http://schemas.android.com/tools"
    android:layout_width="match_parent"
    android:layout_height="match_parent"
    tools:context=".MainActivity">

    <android.support.v7.widget.RecyclerView
        android:id="@+id/recyclerViewVertical"
        android:layout_width="match_parent"
        android:layout_height="match_parent" />
</android.support.constraint.ConstraintLayout>
public class MainActivity extends AppCompatActivity {

    private ArrayList<ArrayList<Movie>> allMovieList = new ArrayList();

    @Override
    protected void onCreate(Bundle savedInstanceState) {
        super.onCreate(savedInstanceState);
        setContentView(R.layout.activity_main);

        this.initializeData();
        RecyclerView view = findViewById(R.id.recyclerViewVertical);

        VerticalAdapter verticalAdapter = new VerticalAdapter(this, allMovieList);

        view.setHasFixedSize(true);
        view.setLayoutManager(new LinearLayoutManager(this, LinearLayoutManager.VERTICAL, false));
        view.setAdapter(verticalAdapter);
    }

    public void initializeData()
    {
        ArrayList<Movie> movieList1 = new ArrayList();

        movieList1.add(new Movie(R.drawable.movie1, "어벤져스"));
        movieList1.add(new Movie(R.drawable.movie2, "미션임파서블"));
        movieList1.add(new Movie(R.drawable.movie3, "아저씨"));

        allMovieList.add(movieList1);

        ArrayList<Movie> movieList2 = new ArrayList();

        movieList2.add(new Movie(R.drawable.movie4, "범죄도시"));
        movieList2.add(new Movie(R.drawable.movie5, "공공의적"));
        movieList2.add(new Movie(R.drawable.movie6, "맨인블랙"));

        allMovieList.add(movieList2);

        ArrayList<Movie> movieList3 = new ArrayList();

        movieList3.add(new Movie(R.drawable.movie7, "고질라"));
        movieList3.add(new Movie(R.drawable.movie8, "캡틴마블"));
        movieList3.add(new Movie(R.drawable.movie9, "아이언맨"));

        allMovieList.add(movieList3);
    }
}
▼ VerticalAdapter 객체를 생성하여 RecyclerView의 Adapter로 연결하고 있습니다. 데이터 초기화는 하드 코딩으로 들어간 점 죄송합니다...