내비게이션 드로어(Navigation Drawer)는 앱에서 사용 가능한 기능을 탐색할 수 있도록 Menu를 제공하는 화면입니다. 기본적으로 화면의 가장자리에 숨겨져 있으며 왼쪽에서 오른쪽으로 스와이프 동작을 수행하거나 App Bar의 아이콘을 클릭하여 화면에 표시할 수 있습니다.
1. 드로어 네비게이션(Drawer Navigation) 구현
1.1 메인 액티비티(Activity) 레이아웃 리소스
<?xml version="1.0" encoding="utf-8"?>
<android.support.v4.widget.DrawerLayout xmlns:android="http://schemas.android.com/apk/res/android"
    xmlns:app="http://schemas.android.com/apk/res-auto"
    xmlns:tools="http://schemas.android.com/tools"
    android:id="@+id/drawer_layout"
    android:layout_width="match_parent"
    android:layout_height="match_parent"
    android:fitsSystemWindows="true"
    tools:openDrawer="start">

    <include
        layout="@layout/appbar"
        android:layout_width="match_parent"
        android:layout_height="match_parent" />

    <android.support.design.widget.NavigationView
        android:id="@+id/nav_view"
        android:layout_width="wrap_content"
        android:layout_height="match_parent"
        android:layout_gravity="start"
        android:fitsSystemWindows="true"
        app:menu="@menu/drawerlayout"
        app:headerLayout="@layout/header"/>

</android.support.v4.widget.DrawerLayout>
Drawer Navigation을 화면에 추가하기 위해서는 화면의 최상단 레이아웃은 DrawerLayout이 배치되어야 합니다. 그 아래 자식 뷰들의 배치 순서는 Main 화면에 표시되는 자식 뷰들이 먼저 오고 Drawer로 사용될 뷰의 경우는 마지막으로 배치하게 됩니다. Main 화면에 배치되는 위젯은 ToolbarLayout 아래에 배치된 Toolbar 하나만 배치된 형태로 해당 영역은 레이아웃 리소스 파일을 따로 정의해두고 <include> 요소를 통해 해당 레이아웃 리소스에 포함시키는 형태를 가집니다. 아래는 /res/layout/appbar.xml의 내용으로 Main 화면에 배치되는 자식 뷰가 정의된 레이아웃 리소스입니다.
<?xml version="1.0" encoding="utf-8"?>
<android.support.design.widget.CoordinatorLayout xmlns:android="http://schemas.android.com/apk/res/android"
    xmlns:app="http://schemas.android.com/apk/res-auto"
    xmlns:tools="http://schemas.android.com/tools"
    android:layout_width="match_parent"
    android:layout_height="match_parent"
    tools:context=".MainActivity">

    <android.support.design.widget.AppBarLayout
        android:layout_width="match_parent"
        android:layout_height="wrap_content">

        <android.support.v7.widget.Toolbar
            android:id="@+id/toolbar"
            android:layout_width="match_parent"
            android:layout_height="?attr/actionBarSize"
            android:background="?attr/colorPrimary" />
    </android.support.design.widget.AppBarLayout>

</android.support.design.widget.CoordinatorLayout>
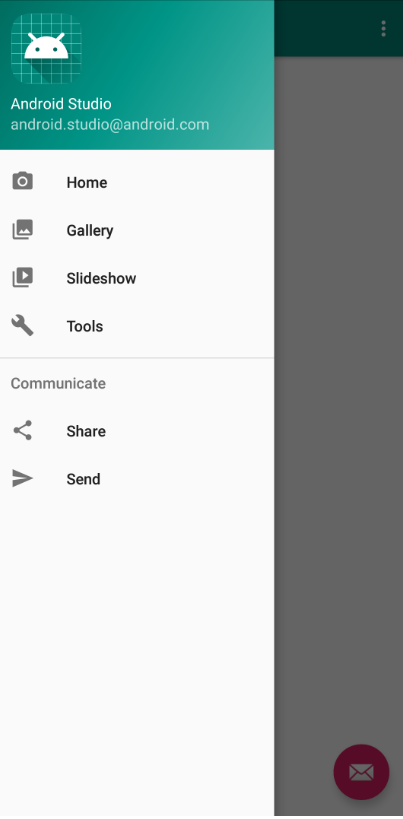
다음으로 Drawer에 배치되는 자식 뷰로 해당 예제에서 NavigationView를 배치하였습니다. NavigationView는 크게 Header 영역과 Content 영역으로 나누어집니다.
Header 영역의 화면을 구성할 레이아웃 리소스는 headerLayout 속성의 속성 값을 지정합니다. 속성 값으로는 레이아웃 리소스 ID 값이 넘어가고 해당 파일은 /res/layout/header.xml 경로에 위치합니다.
<?xml version="1.0" encoding="utf-8"?>
<LinearLayout xmlns:android="http://schemas.android.com/apk/res/android"
    xmlns:app="http://schemas.android.com/apk/res-auto"
    android:layout_width="match_parent"
    android:layout_height="200dp"
    android:background="@color/cardview_dark_background"
    android:gravity="center"
    android:orientation="vertical"
    android:theme="@style/ThemeOverlay.AppCompat.Dark">

    <TextView
        android:id="@+id/text"
        android:layout_width="wrap_content"
        android:layout_height="wrap_content"
        android:text="Select Item"
        android:textSize="50dp" />

</LinearLayout>
다음으로 Content 영역을 구성하기 위해서는 Menu 레이아웃 리소스가 정의된 파일의 리소스 ID를 menu 속성 값으로 지정합니다. 경로는 /res/menu/drawerlayout.xml 위치합니다.
<?xml version="1.0" encoding="utf-8"?>
<menu xmlns:android="http://schemas.android.com/apk/res/android">

    <item
        android:id="@+id/menuitem1"
        android:title="menuItem1" />
    <item
        android:id="@+id/menuitem2"
        android:title="menuItem2" />
    <item
        android:id="@+id/menuitem3"
        android:title="menuItem3" />
</menu>
1.2 Drawer Navigation 추가하기
    @Override
    protected void onCreate(Bundle savedInstanceState) {
        super.onCreate(savedInstanceState);
        setContentView(R.layout.activity_main);

        this.InitializeLayout();
    }

    public void InitializeLayout()
    {
    	//toolBar를 통해 App Bar 생성
        Toolbar toolbar = findViewById(R.id.toolbar);
        setSupportActionBar(toolbar);

        //App Bar의 좌측 영영에 Drawer를 Open 하기 위한 Incon 추가
        getSupportActionBar().setDisplayHomeAsUpEnabled(true);
        getSupportActionBar().setHomeAsUpIndicator(R.mipmap.ic_launcher);

        DrawerLayout drawLayout = (DrawerLayout) findViewById(R.id.drawer_layout);
        NavigationView navigationView = (NavigationView) findViewById(R.id.nav_view);

        ActionBarDrawerToggle actionBarDrawerToggle = new ActionBarDrawerToggle(
                this,
                drawLayout,
                toolbar,
                R.string.open,
                R.string.closed
        );

        drawLayout.addDrawerListener(actionBarDrawerToggle);
    }
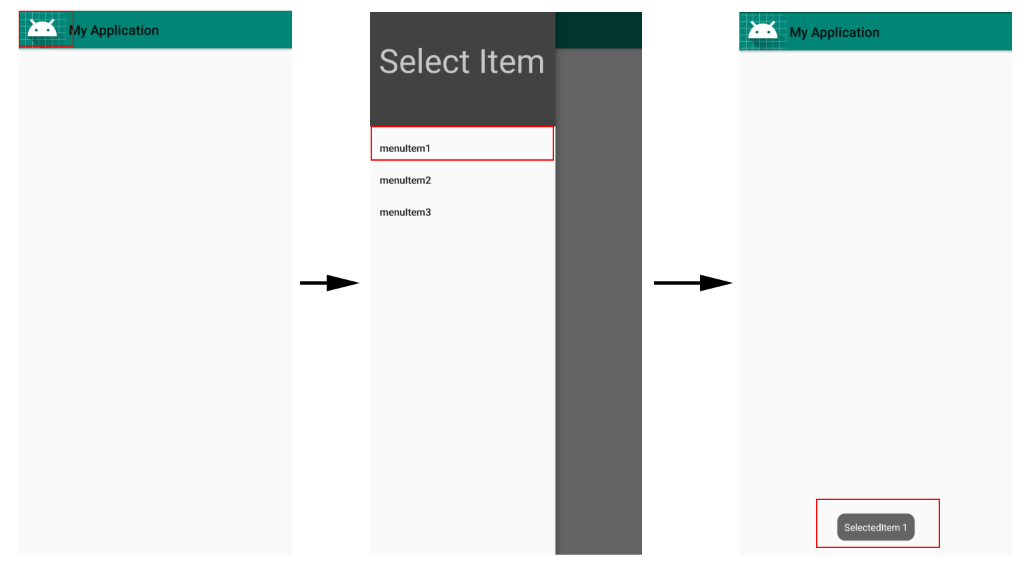
1.3 Navigation의 Item 클릭에 대한 이벤트 처리
        navigationView.setNavigationItemSelectedListener(new NavigationView.OnNavigationItemSelectedListener() {
            @Override
            public boolean onNavigationItemSelected(@NonNull MenuItem menuItem) {
                switch (menuItem.getItemId())
                {
                    case R.id.menuitem1:
                        Toast.makeText(getApplicationContext(), "SelectedItem 1", Toast.LENGTH_SHORT).show();
                    case R.id.menuitem2:
                        Toast.makeText(getApplicationContext(), "SelectedItem 2", Toast.LENGTH_SHORT).show();
                    case R.id.menuitem3:
                        Toast.makeText(getApplicationContext(), "SelectedItem 3", Toast.LENGTH_SHORT).show();
                }

                DrawerLayout drawer = findViewById(R.id.drawer_layout);
                drawer.closeDrawer(GravityCompat.START);
                return true;
            }
        });
▼ Drawer Navigation에서 MenuItem 클릭에 대한 이벤트 처리를 위해 Listener를 등록합니다. MenuItem이 클릭되면 drawer를 닫아주기 위해 closeDrawer()를 호출하고 있습니다.
1.4 이전 버튼 클릭 시 Drawer 닫기
    @Override
    public void onBackPressed() {
        DrawerLayout drawer = findViewById(R.id.drawer_layout);
        if (drawer.isDrawerOpen(GravityCompat.START)) {
            drawer.closeDrawer(GravityCompat.START);
        } else {
            super.onBackPressed();
        }
    }
▼ 이전 버튼을 클릭하였을 때 Drawer가 Open 상태라면 closeDrawer()를 통해 Drawer를 닫아주도록 합니다.