
안드로이드 앱에서 컨텐츠 전환 및 탐색을 위한 Navigation Menu는 여러 가지 방식으로 구현할 수 있습니다. 사용자가 앱 상단의 버튼을 클릭하여 왼쪽에서 오른쪽으로 슬라이드 형식으로 메뉴가 오픈되는 Drawer Navigation 방식과 App Bar 자체에서 앱의 탐색 및 컨텐츠 전환이 가능한 메뉴 모음을 두는 방식 등이 있습니다.
현재 출시 된 안드로이드 앱의 레이아웃 구성을 보면 보통 이러한 메뉴들이 앱의 하단에 위치하고 있습니다. 앱의 탐색 모음을 하단에 배치함으로써 사용자가 한 번의 클릭 동작만으로 앱을 쉽게 탐색하고 전환 가능하도록 하여 사용자가 편리하고 직관적인 UI를 경험할 수 있도록 합니다.
하단 메뉴 구성은 BottomNavigationView를 통해서 구현합니다. 이번 포스팅에서 BottomNavigationView 구현하는 방식에 대해서 하나씩 알아보겠습니다.
1. 예제 앱의 구성
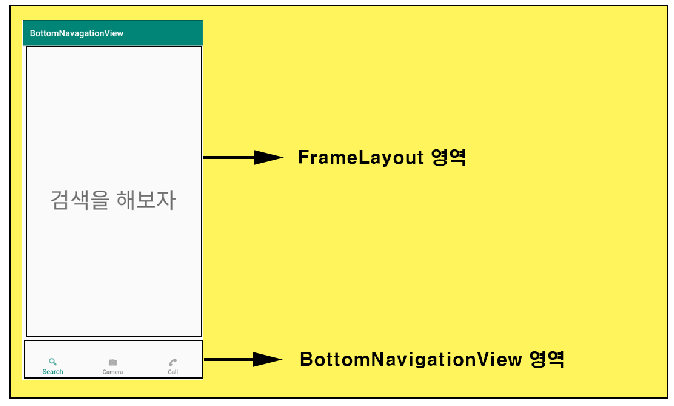
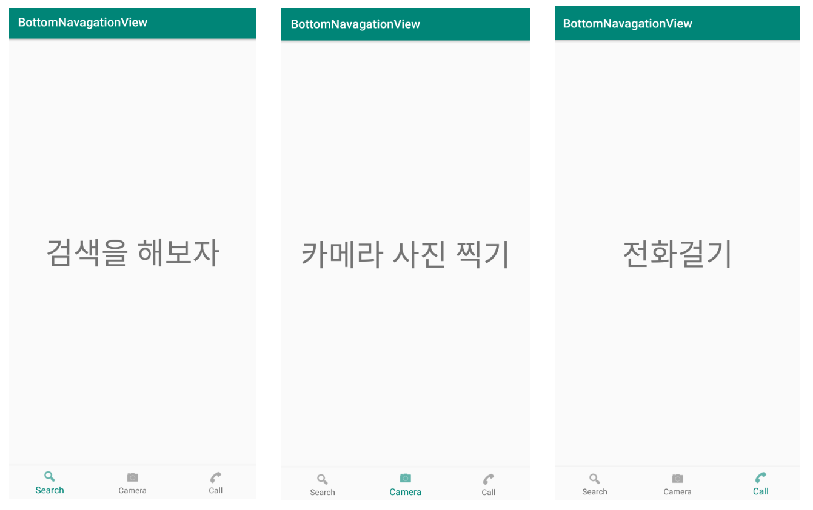
▼ 앱의 화면은 크게 두 가지 영역으로 나눕니다. 하나는 포스팅의 주제인 BottomNavation 영역이며 해당 영역에는 앱의 컨텐츠 탐색을 위한 세 가지 메뉴인 검색 영역, 카메라 영역, 전화 걸기 영역이 들어갑니다. 사용자가 각 메뉴를 클릭하였을 때 그에 맞는 Fragment를 FrameLayout에 배치합니다.
2. BottomNavigationView에 사용할 Menu 리소스 구현
■ /res/menu/menu_bottomnavigationview.xml
<?xml version="1.0" encoding="utf-8"?>
<menu xmlns:android="http://schemas.android.com/apk/res/android">

    <item
        android:id="@+id/searchItem"
        android:icon="@android:drawable/ic_menu_search"
        android:title="Search" />
    <item
        android:id="@+id/cameraItem"
        android:icon="@android:drawable/ic_menu_camera"
        android:title="Camera" />
    <item
        android:id="@+id/callItem"
        android:icon="@android:drawable/ic_menu_call"
        android:title="Call" />
</menu>
▼ BottomNavigationView에서 사용할 Menu 구성을 위한 리소스를 작성합니다. 위치는 /re/menu 폴더 경로에 생성하시고 만약 menu 폴더가 없다면 폴더를 새로 생성 후 그 안에 xml 리소스 파일을 생성해서 작성해줍니다.
3. main 화면 UI를 위한 Xml 레이아웃 리소스 작성
■ /res/layout/activity_main.xml
<?xml version="1.0" encoding="utf-8"?>
<android.support.constraint.ConstraintLayout xmlns:android="http://schemas.android.com/apk/res/android"
    xmlns:app="http://schemas.android.com/apk/res-auto"
    xmlns:tools="http://schemas.android.com/tools"
    android:layout_width="match_parent"
    android:layout_height="match_parent"
    tools:context=".MainActivity">

    <FrameLayout
        android:id="@+id/frameLayout"
        android:layout_width="match_parent"
        android:layout_height="0dp"
        app:layout_constraintBottom_toTopOf="@id/navigationView"
        app:layout_constraintLeft_toLeftOf="parent"
        app:layout_constraintRight_toRightOf="parent"
        app:layout_constraintTop_toTopOf="parent"></FrameLayout>

    <android.support.design.widget.BottomNavigationView
        android:id="@+id/navigationView"
        android:layout_width="match_parent"
        android:layout_height="wrap_content"
        android:background="?android:attr/windowBackground"
        app:layout_constraintBottom_toBottomOf="parent"
        app:layout_constraintLeft_toLeftOf="parent"
        app:layout_constraintRight_toLeftOf="parent"
        app:menu="@menu/menu_bottomnavigationview" />
</android.support.constraint.ConstraintLayout>
▼ 최상위 ConstaintLayout 아래에 FrameLayout과 BottomNavigationView를 배치합니다. 여기서 app:menu 속성값으로 앞서 작성한 BottomNavigationView에서 사용할 menu 리소스 파일이름을 지정해줍니다.
4. Fragment에서 사용할 레이아웃 리소스 작성
■ /res/layout/fragment_search.xml
<?xml version="1.0" encoding="utf-8"?>
<android.support.constraint.ConstraintLayout
    xmlns:android="http://schemas.android.com/apk/res/android"
    xmlns:app="http://schemas.android.com/apk/res-auto"
    android:layout_width="match_parent"
    android:layout_height="match_parent">

    <TextView
        android:id="@+id/textView3"
        android:layout_width="wrap_content"
        android:layout_height="wrap_content"
        android:text="검색을 해보자"
        android:textSize="50dp"
        app:layout_constraintBottom_toBottomOf="parent"
        app:layout_constraintLeft_toLeftOf="parent"
        app:layout_constraintRight_toRightOf="parent"
        app:layout_constraintTop_toTopOf="parent" />
</android.support.constraint.ConstraintLayout>
■ /res/layout/fragment_camera.xml
<?xml version="1.0" encoding="utf-8"?>
<android.support.constraint.ConstraintLayout
    xmlns:android="http://schemas.android.com/apk/res/android"
    xmlns:app="http://schemas.android.com/apk/res-auto"
    android:layout_width="match_parent"
    android:layout_height="match_parent">

    <TextView
        android:id="@+id/textView"
        android:layout_width="wrap_content"
        android:layout_height="wrap_content"
        android:text="카메라 사진 찍기"
        android:textSize="50dp"
        app:layout_constraintBottom_toBottomOf="parent"
        app:layout_constraintLeft_toLeftOf="parent"
        app:layout_constraintRight_toRightOf="parent"
        app:layout_constraintTop_toTopOf="parent" />
</android.support.constraint.ConstraintLayout>
▼ /res/layout/fragment_call.xml
<?xml version="1.0" encoding="utf-8"?>
<android.support.constraint.ConstraintLayout
    xmlns:android="http://schemas.android.com/apk/res/android"
    xmlns:app="http://schemas.android.com/apk/res-auto"
    android:layout_width="match_parent"
    android:layout_height="match_parent">

    <TextView
        android:id="@+id/textView2"
        android:layout_width="wrap_content"
        android:layout_height="wrap_content"
        android:text="전화걸기"
        android:textSize="50dp"
        app:layout_constraintBottom_toBottomOf="parent"
        app:layout_constraintLeft_toLeftOf="parent"
        app:layout_constraintRight_toRightOf="parent"
        app:layout_constraintTop_toTopOf="parent" />
</android.support.constraint.ConstraintLayout>
▼ 검색 영역/ 카메라 영역/ 전화걸기 영역에서 사용할 각 Fragment의 UI 구성을 위한 XML 레이아웃 리소스를 작성합니다.
5. Fragment 상속받는 클래스 작성
■ FragmentSearch.java
public class FragmentSearch extends Fragment {
    public View onCreateView(@NonNull LayoutInflater inflater, @Nullable ViewGroup container, @Nullable Bundle savedInstanceState) {
        return inflater.inflate(R.layout.fragment_search, container, false);
    }
}
■ FragmentCamera.java
public class FragmentCamera extends Fragment {
    public View onCreateView(@NonNull LayoutInflater inflater, @Nullable ViewGroup container, @Nullable Bundle savedInstanceState) {
        return inflater.inflate(R.layout.fragment_camera, container, false);
    }
}
■ FragmentCall.java
public class FragmentCall extends Fragment {
    public View onCreateView(@NonNull LayoutInflater inflater, @Nullable ViewGroup container, @Nullable Bundle savedInstanceState) {
        return inflater.inflate(R.layout.fragment_call, container, false);
    }
}
▼ Fragment를 상속받는 클래스를 작성합니다. onCreateView() 함수를 재정의하고 Inflater를 통해 각 프래그먼트에 해당하는 레이아웃 리소스 ID 값을 통해 생성된 View를 반환합니다.
6. MainActivity.java 구현
public class MainActivity extends AppCompatActivity {

    private FragmentManager fragmentManager = getSupportFragmentManager();
    private FragmentSearch fragmentSearch = new FragmentSearch();
    private FragmentCamera fragmentCamera = new FragmentCamera();
    private FragmentCall fragmentCall = new FragmentCall();

    @Override
    protected void onCreate(Bundle savedInstanceState) {
        super.onCreate(savedInstanceState);
        setContentView(R.layout.activity_main);

        FragmentTransaction transaction = fragmentManager.beginTransaction();
        transaction.replace(R.id.frameLayout, fragmentSearch).commitAllowingStateLoss();

        BottomNavigationView bottomNavigationView = findViewById(R.id.navigationView);
        bottomNavigationView.setOnNavigationItemSelectedListener(new ItemSelectedListener());
    }

    class ItemSelectedListener implements BottomNavigationView.OnNavigationItemSelectedListener{
        @Override
        public boolean onNavigationItemSelected(@NonNull MenuItem menuItem) {
            FragmentTransaction transaction = fragmentManager.beginTransaction();

            switch(menuItem.getItemId())
            {
                case R.id.searchItem:
                    transaction.replace(R.id.frameLayout, fragmentSearch).commitAllowingStateLoss();

                    break;
                case R.id.cameraItem:
                    transaction.replace(R.id.frameLayout, fragmentCamera).commitAllowingStateLoss();
                    break;
                case R.id.callItem:
                    transaction.replace(R.id.frameLayout, fragmentCall).commitAllowingStateLoss();
                    break;
            }
            return true;
        }
    }
}
▼ onCreate() 함수에서는 FragmentTransaction을 사용하여 맨 처음 화면이 나타날 때 FrameLayout에 표시할 프래그먼트를 추가해줍니다. 그다음 BottomNavigationView의 setOnNavigationItemSelectedListener() 함수를 통해 메뉴 클릭에 대한 이벤트 처리를 위한 리스너를 등록해줍니다.
▼ 본문 예제에서는 BottonNavigationView.OnNavigationItemSelectedListener 인터페이스를 상속받아 필수 재정의 함수를 구현하는 ItemSelectedListener 클래스를 정의하였습니다.