
1. 명시적 인텐트(Explicit Intent)
먼저 명시적 인텐트에 대해서 알아보겠습니다. 명시적 인텐트는 실행할 컴포넌트의 이름과 클래스명을 말 그대로 명시적으로 작성하여 우리가 실행하고자 하는 컴포넌트가 명확할 때 사용하는 방식입니다.
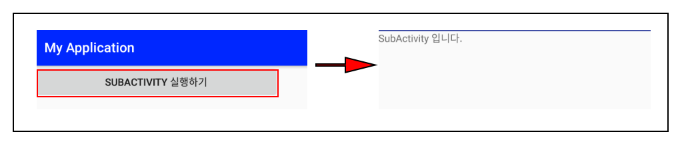
이전 포스팅에서 MainActivity에서 SubActivity를 호출할 때 사용했던 방식이 바로 명시적 방식을 사용한 것입니다. 예제의 의도 자체가 MainActivity에서 SubActivity를 실행하는 의도가 분명하기 때문입니다.
먼저 SubActivity를 호출하는 MainActivity의 xml 레이아웃 리소스입니다.
<?xml version="1.0" encoding="utf-8"?>
<android.support.constraint.ConstraintLayout xmlns:android="http://schemas.android.com/apk/res/android"
    xmlns:app="http://schemas.android.com/apk/res-auto"
    xmlns:tools="http://schemas.android.com/tools"
    android:id="@+id/layout1"
    android:layout_width="wrap_content"
    android:layout_height="wrap_content"
    tools:context="com.example.myapplication.MainActivity"
    tools:layout_editor_absoluteX="0dp"
    tools:layout_editor_absoluteY="81dp">

    <LinearLayout
        android:id="@+id/layout"
        android:layout_width="368dp"
        android:layout_height="wrap_content"
        android:orientation="vertical"
        tools:layout_editor_absoluteX="8dp"
        tools:layout_editor_absoluteY="8dp">

        <Button
            android:id="@+id/button"
            android:layout_width="match_parent"
            android:layout_height="wrap_content"
            android:onClick="OnClickHandler"
            android:text="SubActivity 실행하기" />
    </LinearLayout>

</android.support.constraint.ConstraintLayout>
▼ 먼저 버튼을 클릭하였을 때 SubActivity를 호출하기 위하여 버튼 위젯을 배치합니다. 클릭 이벤트 처리를 위해서 onClick 속성 값을 지정하고 자바 소스코드에서 해당 속성 값을 함수명으로 가지는 함수를 구현합니다.
다음은 MainActivity에서 호출 한 SubActivity의 XML 레이아웃 리소스입니다.
<?xml version="1.0" encoding="utf-8"?>
<android.support.design.widget.CoordinatorLayout xmlns:android="http://schemas.android.com/apk/res/android"
    xmlns:app="http://schemas.android.com/apk/res-auto"
    xmlns:tools="http://schemas.android.com/tool
    android:layout_width="
    xmlns:tools2="http://schemas.android.com/tools"
    android:id="@+id/dialog"
    android:layout_width="wrap_content"
    android:layout_height="wrap_content">

    <LinearLayout
        android:layout_width="wrap_content"
        android:layout_height="wrap_content"
        android:orientation="vertical">

        <TextView
            android:id="@+id/textView6"
            android:layout_width="match_parent"
            android:layout_height="match_parent"
            android:gravity="center"
            android:text="SubActivity 입니다." />
    </LinearLayout>
</android.support.design.widget.CoordinatorLayout>
▼ 해당 화면이 SubActivity임을 표시하기 위해 TextView 위젯을 배치한 형태입니다.
다음은 MainActivity를 실행하는 자바 소스코드입니다.
public class MainActivity extends AppCompatActivity{
    @Override
    protected void onCreate(Bundle savedInstanceState) {
        super.onCreate(savedInstanceState);
        setContentView(R.layout.activity_main);
    }

    public void OnClickHandler(View view)
    {
        Intent intent = new Intent();

        ComponentName componentName = new ComponentName("com.example.myapplication"
                                                        ,"com.example.myapplication.SubActivity");

        intent.setComponent(componentName);

        startActivity(intent);
    }
}
▼ 주목해서 봐야 할 부분은 SubActivity를 실행하는 영역인 OnClickHandler 함수입니다.
OnClickHandler는 Intent 객체를 생성하고 ComponentName 객체를 생성합니다. 생성자 함수 인자로는 두 개가 들어가는데 첫 번째는 실행하는 컴포넌트 패키지명이 들어가고 두 번째 인자는 클래스명입니다. 이처럼 실행하고자 하는 컴포넌트를 명확하게 지정을 한 뒤 setComponent() 함수를 통해 해당 컴포넌트를 등록하고 액티비티를 실행해주는 것입니다. 다음은 SubActivity를 실행하는 자바 소스코드입니다.
public class SubActivity extends AppCompatActivity {
    @Override
    protected void onCreate(Bundle savedInstanceState) {
        super.onCreate(savedInstanceState);
        setContentView(R.layout.activity_sub);
    }
}
▼ 주의 할 것은 해당 포스팅에서는 빠졌지만 SubActivity를 정상적으로 실행하기 위해서는 AndroidManifest에 해당 SubActivity를 등록해줘야 합니다.
2. 암시적 인텐트 (Implicit Intent)
암시적 인텐트는 명시적 인텐트와는 다르게 어떤 의도만으로 원하는 컴포넌트를 실행할 수 있습니다. 예를 들어 앱에서 구글을 실행하고자 하는 경우 웹 페이지를 보여주는 기능이 앱 안에 구현되어있거나 다른 외부 앱을 실행하여 구글을 실행해야 합니다. 이때 인텐트 객체에 '구글 페이지를 띄우고 싶다'라는 정보만 담아 startActivity() 함수를 호출하게 되면 시스템(액티비티 매니저)은 해당 의도를 적절히 처리할 수 있는 컴포넌트를 찾아 처리 결과를 사용자에게 제공합니다.
다음은 액티비티 매니저가 암시적 방식으로 호출한 액티비티를 실행하는 과정입니다.
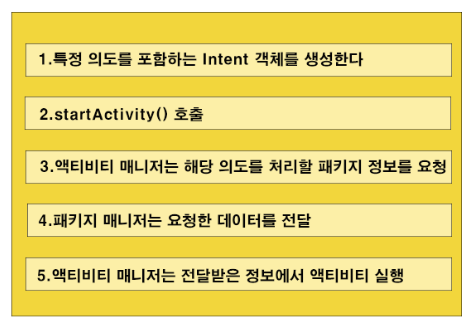
▼ 먼저 특정 의도에 대한 정보를 포함하는 Intent 객체를 생성하고 startActivity() 함수를 호출하게 됩니다. 다음으로 액티비티 매니저가 해당 의도에 적합한 액티비티 정보를 패키지 매니저에게 요청합니다. 패키지 매니저는 단말기에 설치된 모든 앱에 대한 정보를 가지고 있기 때문에 액티비티 매니저가 요청한 의도에 적합한 앱에 대한 정보를 다시 액티비티 매니저에 전달하게 됩니다. 액티비티 매니저는 전달받은 앱의 정보를 통해 원하는 액티비티를 실행하게 됩니다.
암시적 인텐트에 대해 알아보면서 '의도'라는 표현을 많이 사용하였습니다. 그렇다면 이러한 의도에는 어떤 데이터 유형이 있는지 알아보도록 합시다.
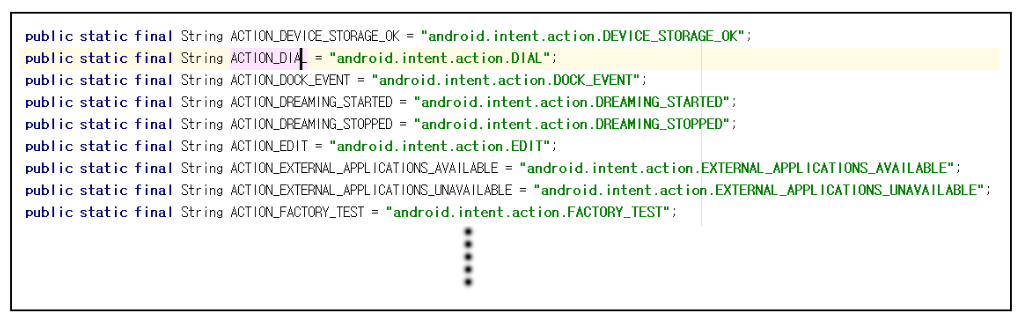
■ 액션(Action)
동작을 실행하는 미리 정의된 문자열을 의미합니다. 아래와 같이 Intent 클래스의 static String Type으로 이미 정의되어 있습니다.
■ 카테고리
해당 액티비티의 분류에 해당됩니다. 액션(Action)과 마찬가지로 Intent 클래스에 미리 정의되어 있습니다. 예를 들어 웹 브라우저를 실행하기 위한 카테고리는 아래와 같습니다.
public static final String CATEGORY_APP_BROWSER = "android.intent.category.APP_BROWSER";
이외에도 CATEGORY_로 시작하는 다양한 공통 인텐트에 대한 카테고리 문자열이 이미 정의되어 있습니다.
■ 데이터
실행하고자 하는 컴포넌트가 특정한 데이터를 필요할 때 지정합니다. 예를들어 구글 페이지를 띄우고자 할 때 URL 정보가 있을 수 있습니다.
3. 암시적 인텐트를 통해 계산기 앱 실행하기
이번 예제에서 사용하는 MainActivity의 XML 레이아웃 리소스는 위에서 명시적 인텐트 예제 구현을 위해 사용했던 리소스와 동일합니다.
public class MainActivity extends AppCompatActivity{
    @Override
    protected void onCreate(Bundle savedInstanceState) {
        super.onCreate(savedInstanceState);
        setContentView(R.layout.activity_main);
    }

    public void OnClickHandler(View view)
    {
        Intent intent = new Intent();

        intent.setAction(Intent.ACTION_MAIN);
        intent.addCategory(Intent.CATEGORY_APP_CALCULATOR);

        startActivity(intent);
    }
}