안드로이드 앱에서 데이터를 저장할 때는 파일(File)이나 데이터베이스(Databaese)를 사용합니다. 하지만 비교적 소규모의 키(Key) - 값(Value)의 자료구조의 데이터는 SharedPreferences API를 사용하여 데이터를 저장합니다.
SharedPreferences 사용하여 저장되는 데이터는 파일 형식으로 저장이 되며 앱이 삭제되기 전까지 보존이 됩니다. 데이터베이스를 사용하는 것처럼 key-value 쌍의 데이터를 저장하고 불러오고 삭제가 가능합니다.
SharedPreferences에는 수치 값이나 간단한 텍스트 또는 자동 로그인 여부와 같은 간단한 사용자 설정값들을 저장하는 용도로 사용됩니다. 저장 가능한 데이터 타입으로는 boolean, int, float, long, String이 있습니다.
1. SharedPreferences 다루는 기본 예제
1.1 xml 레이아웃 리소스
<?xml version="1.0" encoding="utf-8"?>
<android.support.constraint.ConstraintLayout xmlns:android="http://schemas.android.com/apk/res/android"
    xmlns:app="http://schemas.android.com/apk/res-auto"
    xmlns:tools="http://schemas.android.com/tools"
    android:layout_width="match_parent"
    android:layout_height="match_parent"
    tools:context=".MainActivity">

    <Button
        android:id="@+id/btnSave"
        android:layout_width="wrap_content"
        android:layout_height="wrap_content"
        android:text="저장하기"
        app:layout_constraintLeft_toLeftOf="parent"
        app:layout_constraintRight_toLeftOf="@id/btnRemove"
        app:layout_constraintTop_toTopOf="parent" />

    <Button
        android:id="@+id/btnRemove"
        android:layout_width="wrap_content"
        android:layout_height="wrap_content"
        android:text="제거하기"
        app:layout_constraintLeft_toRightOf="@id/btnSave"
        app:layout_constraintRight_toRightOf="parent"
        app:layout_constraintTop_toTopOf="parent" />

    <EditText
        android:id="@+id/editText"
        android:layout_width="0dp"
        android:layout_height="wrap_content"
        android:layout_marginLeft="20dp"
        android:layout_marginRight="20dp"
        android:autofillHints="Text를 입력하세요"
        android:ems="10"
        android:inputType="textPersonName"
        app:layout_constraintLeft_toLeftOf="parent"
        app:layout_constraintRight_toRightOf="parent"
        app:layout_constraintTop_toBottomOf="@id/btnSave" />

    <Button
        android:id="@+id/btnRed"
        android:layout_width="wrap_content"
        android:layout_height="wrap_content"
        android:text="Red"
        app:layout_constraintHorizontal_bias="0.24"
        app:layout_constraintLeft_toLeftOf="parent"
        app:layout_constraintRight_toRightOf="parent"
        app:layout_constraintTop_toBottomOf="@id/editText" />

    <Button
        android:id="@+id/btnBlue"
        android:layout_width="wrap_content"
        android:layout_height="wrap_content"
        android:text="Blue"
        app:layout_constraintLeft_toRightOf="@id/btnRed"
        app:layout_constraintTop_toBottomOf="@id/editText" />

    <Button
        android:id="@+id/btnGreen"
        android:layout_width="wrap_content"
        android:layout_height="wrap_content"
        android:text="Green"
        app:layout_constraintLeft_toRightOf="@id/btnBlue"
        app:layout_constraintTop_toBottomOf="@id/editText" />
</android.support.constraint.ConstraintLayout>
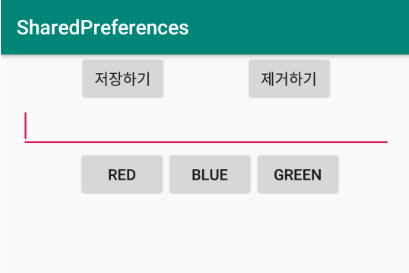
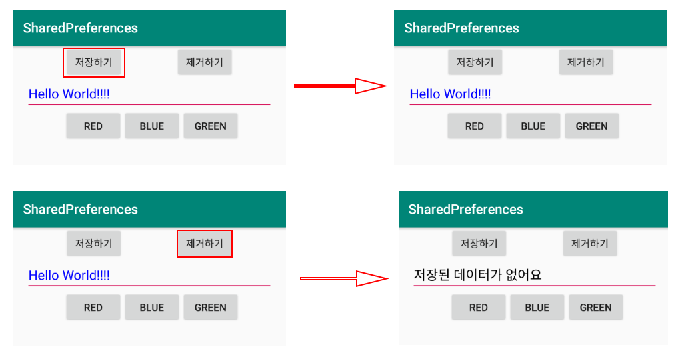
▼ Button 다섯 개와 EditText 한 개로 구성된 메인 화면 구성을 위한 xml 레이아웃 리소스와 실행된 모습입니다.
SharedPreferences 저장 될 데이터는 EditText의 Text 값과 Text의 Color 색상값입니다. Text는 String형이 될 것이고 Color는 int형 데이터가 저장이 됩니다.
▼ 저장하기 버튼을 클릭하였을 때는 SharedPreferences에 현재 EditText의 Text값과 Color 값이 저장이 되며 제거하기 버튼을 클릭하였을 때 SharedPreferences의 모든 데이터를 제거하도록 구현할 것입니다.
1.2 색상 변경 관련 버튼 이벤트 리스너 등록하기
public class MainActivity extends AppCompatActivity {

    private int SelectedColor;
    ...
    ...

    public void setListenerColorbtn()
    {
        View.OnClickListener Listener = new View.OnClickListener(){
            @Override
            public void onClick(View view)
            {
                switch(view.getId())
                {
                    case R.id.btnRed:
                        SelectedColor = Color.RED;
                        editText.setTextColor(Color.RED);
                        break;
                    case R.id.btnBlue:
                        SelectedColor = Color.BLUE;
                        editText.setTextColor(Color.BLUE);
                        break;
                    case R.id.btnGreen:
                        SelectedColor = Color.GREEN;
                        editText.setTextColor(Color.GREEN);
                        break;
                }
            }
        };

        btn_red.setOnClickListener(Listener);
        btn_blue.setOnClickListener(Listener);
        btn_green.setOnClickListener(Listener);

    }
▼ setListenerColorbtn() 함수는 색상 변경 관련된 리스너를 등록하는 함수로 Activity의 onCreate() 함수에서 호출되는 함수입니다. 각 색상 버튼이 클릭되었을 때 전역 변수인 SelectedColor에 Color 값을 저장하고 EditText의 Text의 Color 색상값을 변경해주고 있습니다.
1.3 SharedPreferences 데이터 저장하기 / 제거하기
public class MainActivity extends AppCompatActivity {
    private SharedPreferences preferences;
    private SharedPreferences.Editor editor;
    ....
    .....

    @Override
    protected void onCreate(Bundle savedInstanceState) {
     ....
        //기본 SharedPreferences 환경과 관련된 객체를 얻어옵니다.
        preferences = PreferenceManager.getDefaultSharedPreferences(this);
        // SharedPreferences 수정을 위한 Editor 객체를 얻어옵니다.
        editor = preferences.edit();
     ....
    }

    public void setListenerPreferencebtn()
    {
        View.OnClickListener Listener = new View.OnClickListener(){
            @Override
            public void onClick(View view)
            {
                switch(view.getId())
                {
                    //데이터 저장하기
                    case R.id.btnSave:
                        editor.putInt("color", SelectedColor);
                        editor.putString("text", editText.getText().toString());
                        editor.apply();
                        break;
                    //데이터 제거하기
                    case R.id.btnRemove:
                        editor.remove("color");
                        editor.remove("text");
                        editor.apply();
                        break;
                }
            }
        };

        btn_save.setOnClickListener(Listener);
        btn_remove.setOnClickListener(Listener);
    }
▼ setListenerPreferencebtn() 함수는 저장하기 및 제거하기 버튼에 대한 리스너를 추가하는 함수입니다.
onCreate() 함수 영역에서는 기본 SharedPreferences의 환경정보가 있는 SharedPreferences 객체를 얻어오고 SharedPreferences에 데이터를 추가 및 수정을 위한 Editor 객체를 얻어옵니다. SharedPreferences에 데이터를 추가 및 삭제하기 위해서는 각 타입에 해당하는 함수를 제공하고 있는데 putxxx()의 형태로 사용하시면 됩니다. 첫 번째 인자 정보는 key-value에서 key에 해당하는 값이 들어가며 두 번째 인자에서는 key에 해당하는 value 값이 들어갑니다.
데이터를 제거할때는 Editor 객체의 remove() 함수를 사용합니다. 인자 정보는 한 개로 제거하고자 하는 데이터 쌍의 key값을 인자로 전달합니다.
1.4 SharedPreferences 데이터 가져오기
    public void initializeValue()
    {
        editText.setText(preferences.getString("text","저장된 데이터가 없어요"));
        editText.setTextColor(preferences.getInt("color",Color.BLACK));
    }
▼ SharedPreferences에서 데이터를 가져올때는 getxxx() 형태의 함수를 호출합니다. 첫 번째 인자는 가져올 데이터 쌍의 key에 해당하며 두 번째 인자는 첫 번째 인자의 key에 해당하는 데이터가 없을 경우 default로 가져올 데이터를 지정합니다.
1.5 onCreate()
    @Override
    protected void onCreate(Bundle savedInstanceState) {
        super.onCreate(savedInstanceState);
        setContentView(R.layout.activity_main);

        editText = findViewById(R.id.editText);
        btn_red = findViewById(R.id.btnRed);
        btn_blue = findViewById(R.id.btnBlue);
        btn_green = findViewById(R.id.btnGreen);
        btn_save = findViewById(R.id.btnSave);
        btn_remove = findViewById(R.id.btnRemove);

        setListenerColorbtn();
        setListenerPreferencebtn();

        preferences = PreferenceManager.getDefaultSharedPreferences(this);
        editor = preferences.edit();

        initializeValue();
    }
▼ onCreate() 함수에서는 xml 레이아웃 리소스에 정의된 뷰(View)의 참조 객체를 얻어오며 각 버튼의 리스너 등록을 위한 앞서 구현한 함수들을 호출하고 있습니다.