1. 액티비티 간에 데이터 전달방법
저번 포스팅에서 액티비티를 실행할 때 인텐트(Intent)를 생성하여 사용했습니다. 실행되는 액티비티에 데이터를 전달할 때도 마찬가지로 인텐트(Intent)를 사용하게 됩니다.
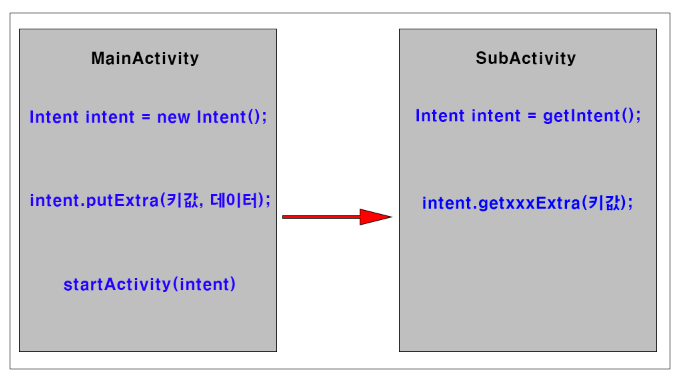
▼ MainActivity에서 SubActivity를 실행하면서 데이터를 전달하는 대략적인 프로세스를 나타내는 그림입니다. MainActivity에서는 액티비티를 실행하기 위해서는 먼저 Intent 객체를 생성합니다.
SubActivity에 데이터를 넘겨줄 때는 Intent 객체에 데이터를 담아 보내는데 해당 함수는 putExtra() 함수입니다. 인자 정보는 두 개로 하나는 데이터를 식별할 수 있는 키값이며 두 번째 인자는 데이터를 넘겨주게 됩니다.
SubActivity에서 전달받은 데이터를 가져오기 위해서는 먼저 자신을 호출한 액티비티에서 생성한 인텐트 객체를 getIntent() 함수를 통해 가져옵니다. 데이터를 가져오기 위해서는 getxxxExtra() 함수와 같이 Type에 맞는 함수를 호출하여 데이터를 가져올 수 있습니다.
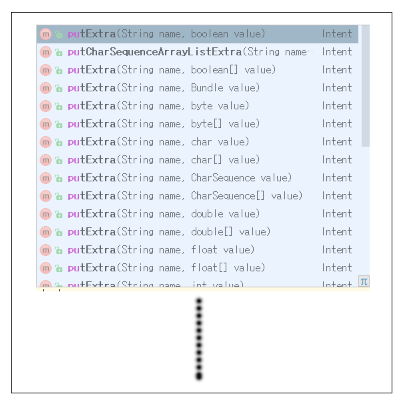
▼ putExtra() 함수는 두 번째 인자에 대해서 여러 Type으로 오버로딩 되어 있습니다.
2. 액티비티 데이터 전달 예제
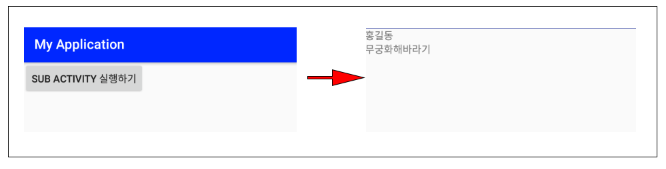
간단하게 MainActivity에서 SubActivity를 실행하면서 데이터를 전달하여 해당 데이터를 SubActivity에 표시하는 예제를 구현해보겠습니다.
<MainActivity XML 레이아웃 리소스>
    <LinearLayout
        android:id="@+id/layout"
        android:layout_width="wrap_content"
        android:layout_height="wrap_content"
        android:orientation="vertical"
        tools:layout_editor_absoluteX="8dp"
        tools:layout_editor_absoluteY="8dp">

        <Button
            android:id="@+id/button2"
            android:layout_width="match_parent"
            android:layout_height="match_parent"
            android:onClick="OnClickHandler"
            android:text="Sub Activity 실행하기" />
    </LinearLayout>
<SubActivity XML 레이아웃 리소스>
    <LinearLayout
        android:layout_width="match_parent"
        android:layout_height="match_parent"
        android:orientation="vertical">

        <TextView
            android:id="@+id/name"
            android:layout_width="match_parent"
            android:layout_height="wrap_content"
            android:text="TextView" />

        <TextView
            android:id="@+id/flowers"
            android:layout_width="match_parent"
            android:layout_height="wrap_content"
            android:text="TextView" />
    </LinearLayout>
<MainActivity 자바 소스>
public class MainActivity extends AppCompatActivity{

    private String name;
    private ArrayList<String> flowerList;


    @Override
    protected void onCreate(Bundle savedInstanceState) {
        super.onCreate(savedInstanceState);
        setContentView(R.layout.activity_main);

        this.InitializeData();
    }

    public void InitializeData()
    {
        flowerList = new ArrayList<String>();

        flowerList.add("무궁화");
        flowerList.add("해바라기");

        this.name = "홍길동";
    }

    public void OnClickHandler(View view)
    {
        Intent intent = new Intent(this,SubActivity.class);

        intent.putExtra("name", "홍길동");
        intent.putExtra("flowers", flowerList);

        startActivity(intent);
    }
}
▼ Button 클릭에 대한 이벤트 처리를 하는 OnClickHandler() 함수내에서 액티비티 실행 및 데이터 전달을 위한 인텐트 객체를 생성하고 있습니다. 데이터 Type은 String과 ArrayList <String> 두 Type에 대한 데이터를 인텐트 객체에 담고 있습니다. 위에서 말했듯이 putExtra() 함수는 여러 Type에 대해 오버 라이딩이 되어 있기 때문에 가능한 구현 형태입니다. Intent 객체에 데이터도 담았으니 startActivity() 함수를 호출하여 액티비티를 호출합니다.
<SubActivity 자바 소스 코드>
public class SubActivity extends AppCompatActivity {

    private TextView textView_name;
    private TextView textView_flowers;

    @Override
    protected void onCreate(Bundle savedInstanceState) {
        super.onCreate(savedInstanceState);
        setContentView(R.layout.activity_sub);

        Intent intent = getIntent();

        textView_name = (TextView)findViewById(R.id.name);
        textView_flowers = (TextView)findViewById(R.id.flowers);

        textView_name.setText(intent.getStringExtra("name"));

        ArrayList<String> flowers = intent.getStringArrayListExtra("flowers");

        textView_flowers.setText("");

        for(int i=0; i < flowers.size(); i++)
        {
            textView_flowers.setText(textView_flowers.getText() + flowers.get(i));
        }
    }

}
▼ getIntent() 함수를 호출하여 MainActivity에서 생성한 Intent 객체를 얻어옵니다. Intent 객체를 가져오게 되면 그 안에 담긴 데이터를 가져올 수 있습니다. Intent 객체는 getxxxExtra() 형태의 함수들을 제공하고 있기 때문에 데이터 Type에 따라 적절히 사용하면 됩니다. 예를 들어 String Type 데이터의 name 키값의 데이터를 가져오기 위해서는 getStringExtra("name") 같은 형태로 작성하면 됩니다.