
■ 기본적인 쓰레드 사용
Thread를 상속받아 run() 메소드를 오버라이딩을 함으로써 간단한 Thread을 구현 해보겠습니다.
|
1
2
3
4
5
6
7
8
9
10
11
12
13
14
15
16
17
18
19
20
21
22
23
24
25
26
27
28
29
30
|
public class Thread1 extends Thread{
int index ;
public Thread1(int index)
{
this.index = index;
}
public void run() //실제로 Thread가 동작하는 내용을 구현합니다.
{
System.out.println(index + "번째 Thread Start");
try
{
Thread.sleep(2000); //단순히 2초동안 thread가 생성되었따가 종료됩니다.
}catch(Exception e){}
System.out.println(index + "번째 Thread End");
}
}
public class Main {
public static void main(String argsp[])
{
Thread1 thread1 = new Thread1(1); //위에 구현한 클래스 객체 생성
Thread1 thread2 = new Thread1(2);
Thread1 thread3 = new Thread1(3);
thread1.start(); //start() 메서드를 통해 Thread 시작, run() 호출됨
thread2.start();
thread3.start();
}
}
|
쓰레드 동작을 위해 Thread를 상속받는 Thread1 클래스를 구현합니다. thead의 인덱스를 넘겨받는 생성자와 쓰레드의 동작을 구현하는 run() 메서드를 오버라이딩 합니다.
Main 영역에서 Thread1 클래스의 객체를 생성하고 start() 메서드를 호출함으로써 쓰레드를 동작시킵니다.

■ join()을 통한 쓰레드 구현
위에 예제 실행 결과를 보면 첫 번째 쓰레드가 먼저 시작했음에도 불구하고 3번째 thread가 먼저 끝났다는 메세지가 먼저 뜹니다. 이것은 thread1 쓰레드를 실행하다가 실행흐름이 thread3로 옮겨지게 되면서 이런 경우가 발생합니다. 하지만 첫 번째 쓰레드가 끝나야지 2번쨰 쓰레드가 실행되고 2번째 쓰레드가 끝나야지 3번째 쓰레드를 실행시키고 싶을 경우가 있을 수 있습니다. 그럴때 사용하는데 join() 입니다.
|
1
2
3
4
5
6
7
8
9
10
11
12
13
14
15
16
17
18
19
20
21
22
23
24
25
26
27
28
29
30
31
32
33
|
public class Thread1 extends Thread{
int index ;
public Thread1(int index)
{
this.index = index;
}
public void run()
{
System.out.println(index + "번째 Thread Start");
try
{
Thread.sleep(2000);
}catch(Exception e){}
System.out.println(index + "번째 Thread End");
}
}
public class Main {
public static void main(String argsp[]) throws InterruptedException
{
Thread1 thread1 = new Thread1(1);
Thread1 thread2 = new Thread1(2);
Thread1 thread3 = new Thread1(3);
thread1.start();
thread1.join(); //thread1이 종료될때 까지 기다립니다.
thread2.start();
thread2.join(); //thread2가 종료될때까지 기다립니다.
thread3.start();
}
}
|
start() 호출 후에 join() 메서드를 호출하는 구조입니다. join은 해당 쓰레드가 종료 될 때까지 대기상태에 있도록 해줍니다.

■ Runnable 인터페이스
Thread 클래스를 상속받아 thread를 구현하는 방법도 있지만 Runnable 인터페이스를 구현하도록 하는 방법도 있습니다. 위에 예제를 Runnable 인터페이스를 구현하는 방법으로 수정 해보겠습니다.
|
1
2
3
4
5
6
7
8
9
10
11
12
13
14
15
16
17
18
19
20
21
22
23
24
25
26
27
28
29
30
|
public class Thread1 implements Runnable{
int index ;
public Thread1(int index)
{
this.index = index;
}
public void run()
{
System.out.println(index + "번째 Thread Start");
try
{
Thread.sleep(2000);
}catch(Exception e){}
System.out.println(index + "번째 Thread End");
}
}
public class Main {
public static void main(String argsp[]) throws InterruptedException
{
Thread thread1 = new Thread(new Thread1(1));
Thread thread2 = new Thread(new Thread1(2));
Thread thread3 = new Thread(new Thread1(3));
thread1.start();
thread2.start();
thread3.start();
}
}
|
Thread 상속받는 대신 Runnable 인터페이스를 구현함으로써 thread를 사용하는 방식입니다.
Main에서 Thread 생성 정보로 구현한 클래스의 객체를 넘겨줌으로써 객체를 생성하는 방식입니다.
■ Synchronized 키워드를 활용한 동기화
동기화란 여러 개의 쓰레드가 한 개의 자원을 사용하고자 할 때 해당 쓰레드를 제외한 나머지 쓰레드는 접근을 못하도록 막는 것을 의미합니다.
예제는 각 쓰레드가 공통 자원을 사용하는데 있어서 순차적으로 한번씩 사용해야 하는 자원에 대해 접근한다고 가정을 하였습니다.
|
1
2
3
4
5
6
7
8
9
10
11
12
13
14
15
16
17
18
19
20
21
22
23
24
25
26
27
28
29
30
31
32
33
34
35
36
37
38
39
40
41
42
43
44
|
public class Main {
public static void main(String argsp[]) throws InterruptedException
{
Resource resource = new Resource();
Thread thread1 = new Thread(new Thread1(resource,"1번쓰레드"));
Thread thread2 = new Thread(new Thread1(resource,"2번쓰레드"));
Thread thread3 = new Thread(new Thread1(resource,"3번쓰레드"));
thread1.start(); //차례대로 쓰레드를 실행
thread2.start();
thread3.start();
}
}
public class Thread1 implements Runnable{
private Resource resource;
private String name;
public Thread1(Resource resource,String name)
{
this.resource = resource;
this.name = name;
}
public void run()
{
try
{
for(int i=0;i<3;i++)
{
resource.getResource(name); //0번 index부터 차례대로 자원을 사용
}
}catch(Exception e){}
}
}
public class Resource {
private int Resource_index = 0;
public void getResource(String name)
{
System.out.println(name +"=" +Resource_index + "번째 resource 사용"); //자원을 사용했다고 가정
Resource_index ++; //다음 자원의 index
}
}
|
프로그램은 thread1,thread2,thread3가 Resoucr 객체의 Resource_index를 0번부터 차례대로 호출해서 사용할려고 합니다. 한번 사용하고나면 Resource_index를 증가시키게 됩니다. 동기화 되지 않은 상태이며 결과를 먼저 보겠습니다.
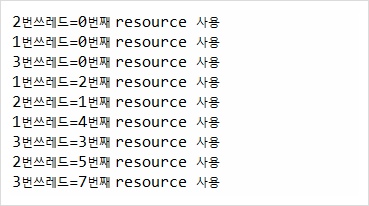
0번째 자원은 여러번 사용 되었을 뿐만 아니라 순차적으로 자원을 사용하지도 못하고 있습니다.
|
1
2
3
4
5
6
7
8
9
10
11
12
13
14
15
16
17
18
19
20
21
22
23
24
25
26
27
28
29
30
31
32
33
34
35
36
37
38
39
40
41
42
43
44
|
public class Main {
public static void main(String argsp[]) throws InterruptedException
{
Resource resource = new Resource();
Thread thread1 = new Thread(new Thread1(resource,"1번쓰레드"));
Thread thread2 = new Thread(new Thread1(resource,"2번쓰레드"));
Thread thread3 = new Thread(new Thread1(resource,"3번쓰레드"));
thread1.start(); //차례대로 쓰레드를 실행
thread2.start();
thread3.start();
}
}
public class Thread1 implements Runnable{
private Resource resource;
private String name;
public Thread1(Resource resource,String name)
{
this.resource = resource;
this.name = name;
}
public void run()
{
try
{
for(int i=0;i<3;i++)
{
resource.getResource(name); //0번 index부터 차례대로 자원을 사용
}
}catch(Exception e){}
}
}
public class Resource {
private int Resource_index = 0;
public synchronized void getResource(String name) //동기화
{
System.out.println(name +"=" +Resource_index + "번째 resource 사용");
Resource_index ++;
}
}
|
이번엔 synchronized 키워드를 사용하여 getResource()를 동기화 하였습니다.
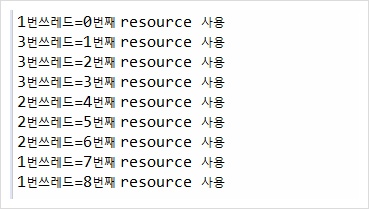
이번에는 한번 사용된 자원은 재사용되지 않았고 순차적으로 잘 사용하고 있습니다.