Spring Security는 다음과 같은 순서로 동작하게 된다.
- <security:http> 영역안의 인증정보를 얻게 된다.
- 인증이되지 않은 경우, form-login login-page 항목의 url로 이동하게 된다.
- 인증은 기본적으로 {wepapp}/j_spring_security_check에서 처리되게 되며, 페이지의 in/out값은 j_username, j_password가 된다.
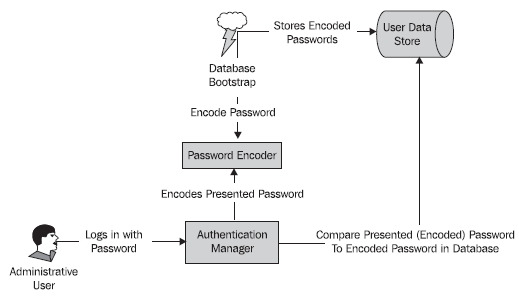
- j_spring_security_check는 등록된 authentication-manager의 authentication-provider에 username만을 넘긴다.
- username을 이용, authentication-provider는 username, password, authentication-role을 설정해서 사용자 정보를 넘겨준다.
- Spring security에서 j_spring_security_check 에서 반환된 사용자 정보를 이용. password가 일치하는지 확인
- password가 일치되는 경우, authentication-success-handler-ref 에 정의된 Handler를 이용해서, page의 이동이나 json 응답을 준다.
- password가 일치되지 않는 경우, authentication-failure-handler-ref 에 정의된 Handler를 이용해서, page의 이동이나 json 응답을 준다.
하나 중요한 상황이. web.xml에 반드시 securityFilter와 ContextLoaderListener가 선언이 되어야지 된다.
spring web mvc에서 각 controller들이 url을 등록하지만, 각 servlet의 applicationContext를 모두 포함하는 parent의 개념에서 spring security가 접근이 된다고 생각해야지 된다.
구성한 web.xml 파일의 내용은 다음과 같다
<?xml version="1.0" encoding="UTF-8"?>
<web-app xmlns:xsi="http://www.w3.org/2001/XMLSchema-instance"
xmlns="http://java.sun.com/xml/ns/javaee" xmlns:web="http://java.sun.com/xml/ns/javaee/web-app_2_5.xsd"
xsi:schemaLocation="http://java.sun.com/xml/ns/javaee
http://java.sun.com/xml/ns/javaee/web-app_3_0.xsd"
id="WebApp_ID" version="3.0">
<display-name>board</display-name>
<welcome-file-list>
<welcome-file>index.jsp</welcome-file>
</welcome-file-list>
<servlet>
<servlet-name>spring</servlet-name>
<servlet-class>org.springframework.web.servlet.DispatcherServlet</servlet-class>
<load-on-startup>1</load-on-startup>
</servlet>
<servlet-mapping>
<servlet-name>spring</servlet-name>
<url-pattern>/</url-pattern>
</servlet-mapping>
<listener>
<listener-class>org.springframework.web.context.ContextLoaderListener</listener-class>
</listener>
<filter>
<filter-name>encodingFilter</filter-name>
<filter-class>org.springframework.web.filter.CharacterEncodingFilter</filter-class>
<init-param>
<param-name>encoding</param-name>
<param-value>UTF-8</param-value>
</init-param>
</filter>
<filter-mapping>
<filter-name>encodingFilter</filter-name>
<url-pattern>/*</url-pattern>
</filter-mapping>
<filter>
<filter-name>springSecurityFilterChain</filter-name>
<filter-class>org.springframework.web.filter.DelegatingFilterProxy</filter-class>
</filter>
<filter-mapping>
<filter-name>springSecurityFilterChain</filter-name>
<url-pattern>/*</url-pattern>
</filter-mapping>
</web-app>
applicationContext.xml 파일의 내용은 다음과 같다.
<beans:beans xmlns="http://www.springframework.org/schema/security"
xmlns:beans="http://www.springframework.org/schema/beans" xmlns:xsi="http://www.w3.org/2001/XMLSchema-instance"
xsi:schemaLocation="http://www.springframework.org/schema/beans
http://www.springframework.org/schema/beans/spring-beans-3.0.xsd
http://www.springframework.org/schema/security
http://www.springframework.org/schema/security/spring-security-3.1.xsd">
<beans:bean id="userService" class="com.xyzlast.services.UserServiceImpl" />
<beans:bean id="loginProcessHandler" class="com.xyzlast.handlers.LogInProcessHandler" />
<beans:bean id="encoder"
class="org.springframework.security.crypto.password.StandardPasswordEncoder" />
<http use-expressions="true">
<intercept-url pattern="/account/index" access="permitAll" />
<intercept-url pattern="/**" access="isAuthenticated()" />
<intercept-url pattern="/welcome" access="isAuthenticated()" />
<form-login login-page="/account/index"
authentication-success-handler-ref="loginProcessHandler"
authentication-failure-handler-ref="loginProcessHandler" />
</http>
<authentication-manager>
<authentication-provider user-service-ref="userService">
<password-encoder ref="encoder" />
</authentication-provider>
</authentication-manager>
</beans:beans>
 이클립스에서 인코딩 설정
 이클립스 파일 찾기 & 문자열 검색


